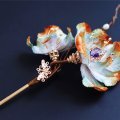
Vocab of Wrapped Flower
Wrapped flower - 缠花 (chán huā) - a name used to called artificially made flower using the techniques of wrapping colored silk thread around cut-out pieces and combining each parts together to make flowers, animals, insects, etc.
Spring Flower - 春仔花 (chūn zǐ huā) or 春花 (chūn huā). Used in this situation would mean various types of flower combined into a small batch each flower symbolize for different meanings in China. In this case, the flower would be a wrapped flower rather than a real flower.
History of Wrapped Flower
Through ancient China, people held a profound appreciation for nature, which manifested in their beliefs of deities who governed natural forces to their interest in making poetry, music, and artworks that represented the beauty they saw. One remarkable custom in ancient China were the flower hair-pinning practice known as "簪花的习俗 (zān huā de xí sú)," where both men and women adorned their hair or hat with flowers, either fresh or artificially made. Talking about flowers, there are many artificial flower craftsmen that have passed down for centuries, including "ronghua" and "wrapped flower."
The art of wrapped flowers originated during the Ming Dynasty and arrived in the Qing Dynasty. However, the materials used, such as silk thread, have a limited lifespan of only six months to two years, making preservation challenging from the dynastic eras till now. Thus, there are little to no artifacts of wrapped flowers that actually got unearthed Proving the beauty of the past. Wrapped flower is another one of Chinese craftsmanship that is slowly fading from current society, But with more people seeking to learn more about Chinese culture, it has been brought up once again as a hobby.
Wrapped flower, specifically known as “湖北英山缠花 (hú běi yīng shān chán huā)” in Hubei, Yingshan, is listed as a provincial intangible heritage protection item. However, other areas across China, such as Fujian (闽南地区, mǐn nán dì qū) and Taiwan, are also known for their wrapped flower skills and preservation. The differences between them lie in their purposes, meanings, and how they are used as decorations for festivals. Each area that works with wrapped flowers has its specific colors and preferred flowers people used often. Some areas will use red flowers more often and some would use insects more.
Wrapped Flower in Different Areas
Here, we will understand a bit about the characteristics of wrapped flowers based on regions and what they are mainly used for.
Minnan
In Minnan (闽南, mǐn nán, Southern part of Fujian): big red flowers (大红色的花卉). A nickname for the wrapped flower for Fujian is “福建的春仔花 (Fujian’s Spring Flower). “春仔花” / “春花 (chūn zaǐ huā/ chūn huā),” or “象征花 (xiàng zhēng huā)” basically means a tied up batch of wrapped flower, similar to a small boutique of different combined flowers that is small enough to be pinned on hair or used as brooch. “春 (chūn),” “spring” in Minnan accent is a homophonic of “剩,” which symbolized “surplus every year (年年有余, nián nián yǒu yú) so during festivals, women would wear “spring flowers” that represented their wishes and hopes for themselves or for their family and businesses.
The custom of wrapped flowers lasted for over 400 hundred years, and with time, more flower opinions were added into the selection. It follows a simple step for combining the various wrapped flowers. Either it is wrapped on with threads, stitched, or sewn on. Article I researched also said that “spring flower” is made into the shape of Chinese ingots (元宝, yuán bǎo), and the combined flowers will be put together within that shape. Not sure if it applies to all types of festivals and regions, but that is an interesting idea.
I can’t exactly find each of the flower’s meaning and usage in festivals, but there are over dozens of flower, such as the pomegranate flower, plum blossom, child flower, and flowers used on funerals.
Yingshan
Then in Hubei, Yingshan, a wrapped flower is considered a type of traditional art project held in contests. Participants may even create large or auspicious animals such as phoenixes and dragons, or include Chinese texts. Yingshan wrapped flower are mainly used in four stages of life - birth, birthday, marriage, and death - each stages using different types of flower that represent different meaning.
The color of wrapped flowers in Hubei, Yingshan is more festive, featuring saturated and contrasting colors. In Yingshan, popular options for wrapped flowers include insects, birds, flowers, and fruits.
Taiwan
Lastly, in Taiwan, wrapped flowers with insects, birds, and flowers are the popular choices. The gradient is smoother and more natural, offering more options than just a solid blocks of color. The usage of wrapped flowers varies, serving as worship offerings in ancient times to becoming lifestyle decorations in modern settings.
If you're interested in learning more about Taiwan's wrapped flower craft, you can explore Zheng Huimei's (郑惠美) book "Hakka Needlecrafts In Taiwan: Chan-hua (Silk-Wrapped Flowers, 台湾客家女红工艺缠花)", which delves into the origin and development of this cultural craft. It contains content in both English and Chinese, along with step-by-step instructions for those interested in trying wrapped flower art.
Depending on the region and the specific usage during festivals, wrapped flowers may be called differently, such as 春仔花 (chūn zǐ huā), 线花 (xiàn huā), 绣线花 (xiù xiàn huā), and 吉花等 (jí huā děng), reflecting their diverse purposes.
Different Wrapped Flowers: Taiwan Wedding
Bride - Pomegranate Flower (石榴花, shí liú huā) called "三石榴 (sān shí liú)": The bride wears a pair of large red flowers with pomegranate-shaped wrapped flowers, symbolizing "marrying in pairs" and "giving birth to a child soon after marriage." Many seeds in the pomegranate signify the wish for many children and grandchildren, and overall auspiciousness.
Bride's Mother - Murray's Paniculata/Orange Jasmine: The bride's mother wears orange jasmine flowers, representing "auspiciousness and good fortune."
Mother-in-law - Ixora Coccinea: The mother-in-law wears a combination of red tortoises, a pomegranate, a deer, and a tortoise. This ensemble symbolizes blessings, prosperity, wealth, and longevity, bringing good fortune and longevity to the mother-in-law.
Matchmaker - Lily Flower: The matchmaker wears a pink lily flower, symbolizing "harmonious union for hundreds of years."
Meanings of Yingshan Wrapped Flowers
- Adorable, Sweet, and Pure Child (小孩“洗三朝," xiǎo hái “xǐ sān cháo”): Small lion heads, fish, and flowers can be attached to the child's shoes or hat, symbolizing a bright future, auspiciousness, blessings, and prosperity.
- Wrapped Flowers with Colored Silk Thread Around Pen and Ink (一长二大, 读书晋学, yī cháng èr dà, dú shū jìn xué): Symbolizes the pursuit of education and academic success.
- Wrapped Flowers with Ten Copper Coins with Festive Patterns and Ten Beautiful Flowers (十全十美, shí quán shí měi): Represents perfection and completeness.
- Wrapped Longan String (团团圆圆, tuán tuán yuán yuán): Symbolizes a harmonious and united family.
- Wrapped Dates and Peanuts Together (早生贵子, zǎo shēng guì zǐ): Wishing for the couple to have children early.
Decorations on Wedding Bed's Curtains:
- Symbols like "喜鹊咏梅, xǐquè yǒng méi" (magpies singing to plum blossoms)
- "凤戏牡丹, fèng xì mǔ dān" (phoenix playing with peonies)
- "恩哥戏菊, en gē xì jú" (mandarin ducks playing with chrysanthemums)" are added to create a festive atmosphere.
Wrapped flowers are also used for celebrating elderly birthdays, expressing good wishes such as:
- "金玉满堂, jīn yù mǎntáng" (abundance of wealth);
- "福如东海, fú rú dōng hǎi" (blessings as vast as the eastern sea);
- "寿比南山, shòu bǐ nán shān" (longevity compared to Nanshan Mountain);
- "福禄双全, fú lù shuāng quán" (prosperity and high rank).
Additionally, wrapped flowers are used in funerary customs, but due to their high cost and lack of decorative value, they are limited to affluent households. Some flowers used in funerals include (depending on customs, regions, choices, preferences, etc.);
- 白菊花 (bái jú huā) - White Chrysanthemums: Chrysanthemums are commonly associated with mourning and are a popular choice for funeral arrangements.
- 铁线莲 (tiě xiàn lián) - Iron Wire Lotus: These are artificial lotus flowers made of iron wire, often used in funeral decorations due to their long-lasting nature.
- 松针缠花 (sōng zhēn chán huā) - Pine Needle Wrapped Flowers: Pine needles are used to create simple and elegant funeral flower arrangements.
- 紫丁香 (zǐ dīng xiāng) - Purple Lilacs: Purple lilacs are sometimes used in funeral wreaths, symbolizing mourning and remembrance.
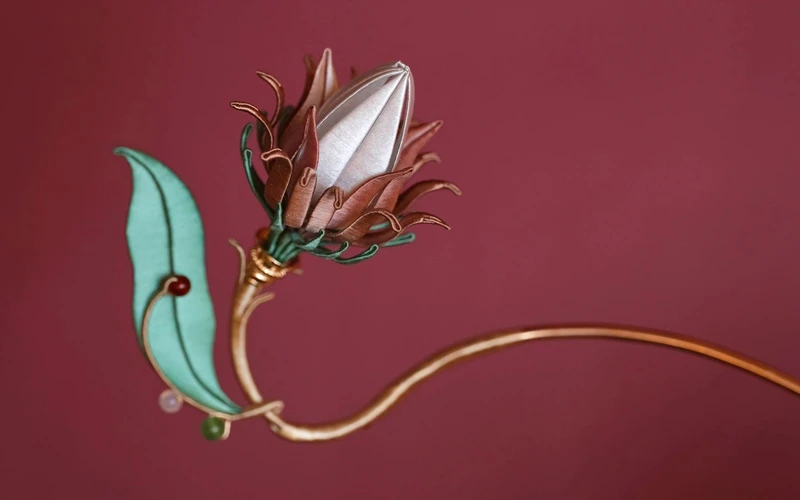
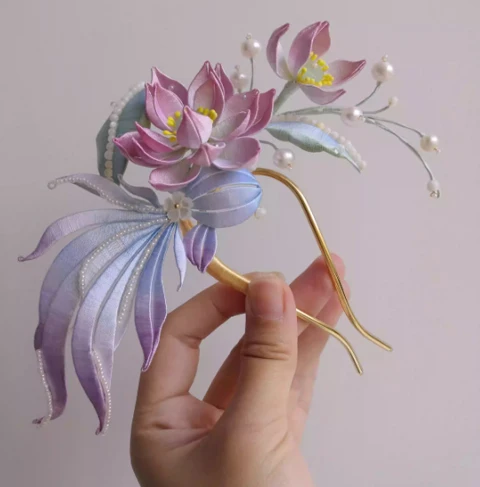
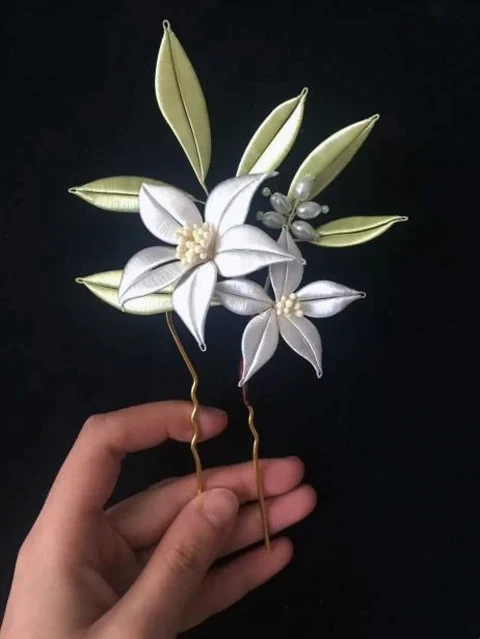
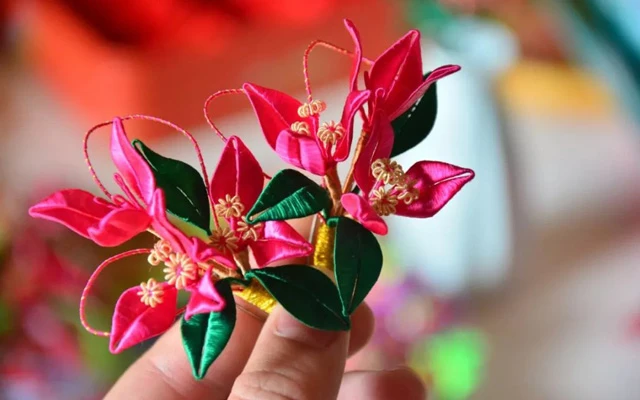
Wrapped Flowers DIY
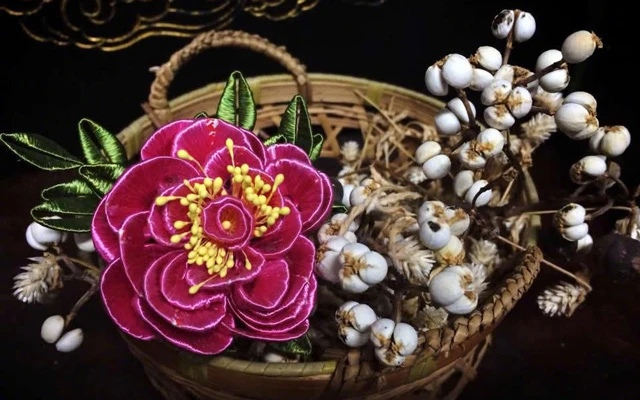
Wrapped flowers are quite similar to ronghua in both materials and appearance. Nowadays, people also mix ronghua, wrapped flowers, heat-shrunk petals, and beads to create unique and varied designs. Ronghua is known for its fluffy look, created by using small silk threads for the edges.
On the other hand, wrapped flowers have a shinier appearance as they are wrapped around a small piece using one or more threads to create a smooth surface. The characteristics of wrapped flowers are "small," "delicate," "exquisite," and "lively." Both the court ladies and commoners admire this craft.

Materials
- Cardboard cut-outs (either buy paper with shapes already printed or cut out a template yourself using thick paper).
- Silk threads (either gradients or solid colors).
- 0.15mm - 0.2mm copper wire.
- Tweezers/pliers.
- Glue & water.
- Paintbrush (or any type of small brush to apply glue).
- Scissors.
Note: The above materials are required to make the wrapped flower in purple. If you are combining the result onto brooches, hairpins, or want to add other decorations, you will need additional materials.
Additional materials
- Beads.
- Hairpins.
- Acrylic/epoxy flower-shaped beads (optional).
- Faux pearl beads (oval, pearl-shaped, rice-shaped, etc.)
- Artificial flower stamens.
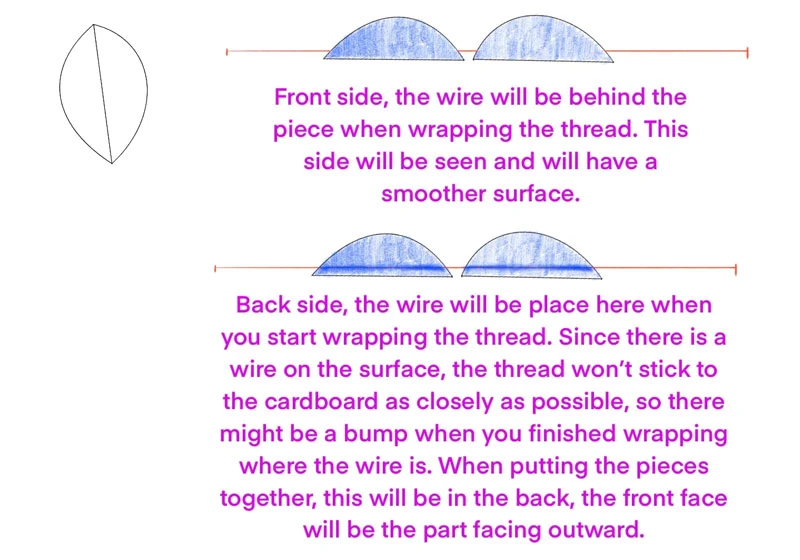
Determining Front and Back Side
First, you need to start with some cutout pieces that will form the flower you want to create. You can find template shapes online, trace them onto thin paper, and then transfer them onto thickened cardboard before cutting them out. Alternatively, you can buy pre-made stacks of outlines. If you have time, you can make yourself a reusable template with all the shapes needed for future use.
Next, take a cut-out piece and choose a "front" and "back" face. Some cut-out pieces come as one "entire" piece, so you don't have to cut them into smaller parts for individual wrapping. Others have more lines drawn within the shape, requiring you to cut them into smaller pieces for individual wrapping. If it's the second option, first cut across all the lines.
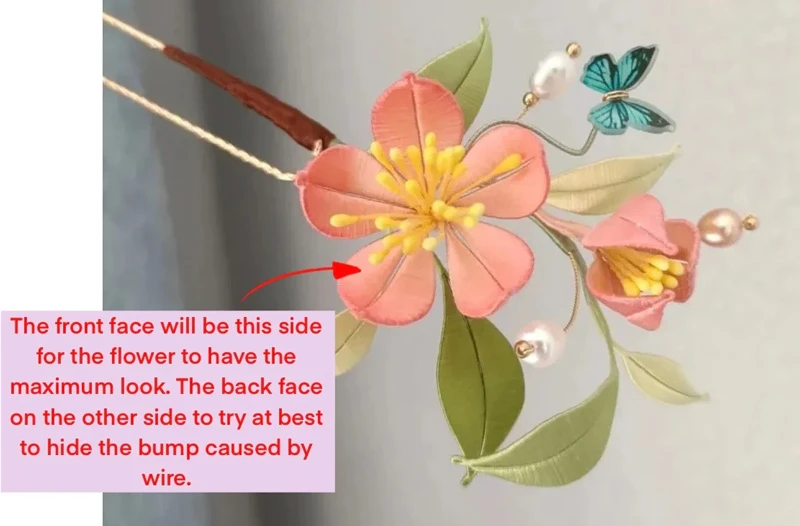
The "front face" will be the side facing upward and looked at more often. The "back" face will be the side observed less frequently, and it's where we will attach the copper wire before starting to wrap the threads.
Cutting Copper Wire
Next, you will cut out enough copper wire for the piece you will be working on.
If it's just one piece, you lay the wire under the "back" face and roughly measure how long it needs to be. The wire should extend slightly beyond the length of the cardboard, leaving some extra for wrapping the thread around.
If the shape has smaller pieces that you follow and cut out, you can lay all the pieces in a line and measure the wire to cover the entire length of the combined pieces. This way, you won't have to cut the copper wire into many small lengths to work on individual pieces. Depending on your preferences and the product you are making, you may use multiple wires to connect smaller pieces or put all the pieces on one wire.
The simplest shape is one-piece cutouts, but the most commonly seen types are one-piece and two-piece shapes. However, wrapped flowers can become more complex with multiple splits in a shape. In such cases, you will also need to understand how to bend the wire to have the splits at the right places.

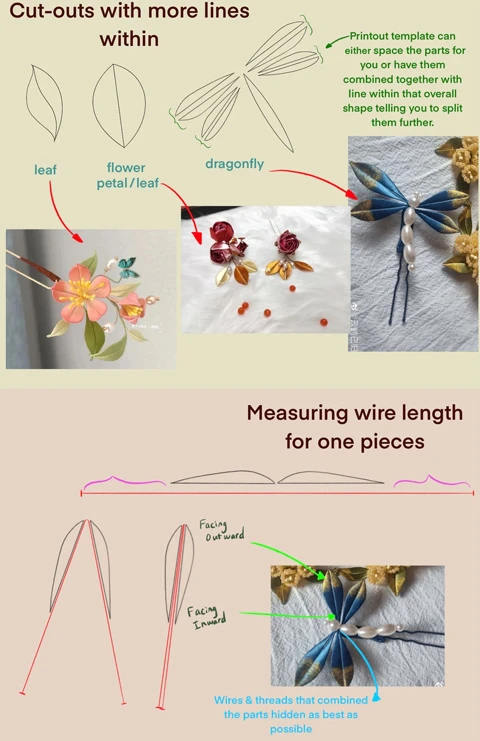
For the many piece ones, you have to determine which end will be the part facing outward and which will be the end used to connect other parts. The part that will be facing outward will be facing to the middle of the wire because when you cut the wire and start wrapping threads to it, when you finish wrapping you will bend the wire to have the smaller piece fit back to the shape of a full piece.
E.g. I cut one dragonfly wing to two parts, the curvier edge will be facing outward of the dragonfly body that I will have to connect at the final step, thus it will face the middle of the wire. The end that will hold the extra length of wire will be pointing outward on the measuring part. When I finished wrapping I will fold the wire in half, putting the shape that I originally cut in half back to that teardrop shape. In this case, the extra wire part will be at the sharper end for me to use to attach other parts.
Wrapping Thread; Types of Thread
The amount of thread you use for wrapping depends on your preference. Some people use two threads together as a group, while others combine four threads and use them as one thread.
Wrapped flowers also use silk thread, but if you buy silk thread specifically for wrapped flowers, you'll notice that it comes wrapped around a plastic container, similar to regular thread, rather than in a pretzel twist like ronghua thread. However, this doesn't mean you can't use ronghua thread for wrapped flowers.
If you use wrapped flower-specific thread, it already comes slightly fluffy, and you can start wrapping right away.
On the other hand, if you use ronghua thread, you may need to first split the smaller threads if the type you own is one thread made up of many smaller threads twisted together (similar to the step in DIY ronghua thread splitting). If the type of thread doesn't need splitting, you can cut similar lengths of two or four threads and use them as one to start wrapping.

Wrapping Thread; Wrapping
- Left hand - holding wire
- Right hand - holding thread
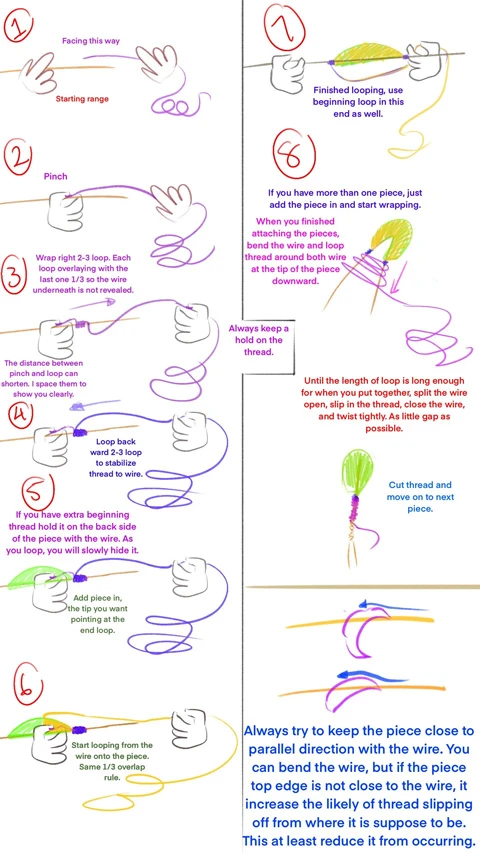
- Pick up the wire and thread, and always start wrapping the thread on the right side. Hold the wire with one hand near the right edge and the other hand near the beginning end of the thread. (For easy understanding, we'll use the left hand for the wire and the right hand for the thread.)
- Since we started wrapping on the right side, leave some space on the wire toward the right end, not starting completely on the exact right without any spacing for the wire. Estimate to start wrapping the thread about ¼ length on the wire.
- The end of the thread we are holding onto will face the hand holding the wire.
- Using your left hand, use the thumb to pinch the end of the thread with the wire to hold it stable as you start wrapping.
- At the beginning of the wrap, we don't jump right into wrapping the piece; we need to wrap the thread around the wire first and then add in the pieces so that later the piece doesn't easily fall off from its attachment on the wire.
- Wrap two to three loops toward the right (holding the thread) and then two to three loops toward the left (holding the wire). By now, we have attached the thread to the wire somewhat.
- We can start attaching the pieces. (Understand the side of the piece facing outward and inward in the image above. This is also known as the petal/leaf tip and root. The tip will be facing outward, vice versa.)
- We will want the root (tip) of the piece to be the point where we start wrapping, with the thread located on the wire now. (If it's a one-piece cutout, you don't have to worry about tip or root. If it's many pieces, you have to be clear which side is the root of the petal and which is the tip.)
- Put the piece on top of the wire, that side will be the "front" face. The tip of that cutout piece will be pointing at the location where we just stopped the thread.
- Using the left hand (wire), pinch the piece down with the wire. Using the right hand (thread), start looping in the same direction we did before to transition the thread from being on the wire to the piece.
- As we loop the thread, we also need to straighten/smooth out the thread to make sure that it did not twist before we start wrapping it on the piece. Otherwise, if you look closer, some areas will be smooth because those areas have the thread straightened, while other areas will have the thread already spiraled together, which will only add texture to the surface, which in this case is not what we are looking for.
- Make sure the next loop of thread overlays on the last loop around ⅓ to ensure that none of the cardboard is showing or the thread from slipping, especially if the piece you are working on has large curves.
- Ensure that as you wrap the top edge of the piece, it is close to parallel to the direction of the wire, not having the wire completely near the bottom of the piece.
- Repeat the wrapping step until you reach the end of the piece.
- If you are working on only one entire piece, then you have already finished wrapping one part, and you can skip the next three steps.
- Now, if you have more pieces to attach since you cut the original shape into smaller bits, wrap the thread 2 to 3 times, transitioning from the piece onto the wire.
- Then add in the next piece, following the tip and root rules.
- Follow the same technique of wrapping and smoothing the thread as you transition from the wire back onto the new pieces.
- When you have finished wrapping the many pieces to the wire, hold the extra thread tightly with the right hand (thread).
- Fold up the wire and put the pieces that you split back together to its original shape. The wires will be parallel to each other now.
- Continue wrapping with the right hand (thread), this time wrapping around both of the wires, downward to stabilize the fold.
- After you transition off the piece and onto the wire, wrap a few more times around both wires.
- Then split up the wire again, and wrap the thread into the split of the thread, pulling upward.
- Hold on tightly to both wires and close the split once again.
- Then twist the two wires together a few times to secure the thread from slipping out of the wire again and loosening the thread on the piece. Make sure to twist the wires as close and tight to each other as possible without bending.
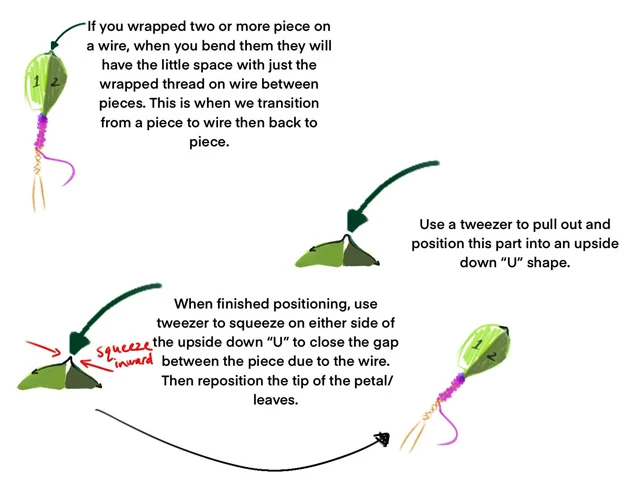
- Next, use a tweezer to go back up to where the wire is bent between the pieces and use the tweezers to reshape the wire until a little bump is protruding outward.
- Then use the tweezers to squeeze on both sides of the bump to push that little part of the wire together into a sharp tip, representing the tip of the petal or leaf.
- The basic shape of a petal/leaf is now done!
- Next, repeat this step on the remaining pieces and then put the pieces together.
Adding Glue
- When you have finished with all the pieces, mix water and glue together in a ratio of 1:1 thoroughly. (There is no exact ratio for watering down the glue; some go by 1:1, while others add more water.)
- Next, use a small brush to gently apply the watered-down glue to the backside of the pieces to prevent the thread from slipping off. (Depending on personal preference, you can add glue only to the edges of the pieces or cover the entire surface of both sides. Just remember to apply a thin coat; if it's too thick, it might leave a white cast when it dries. You can test the glue on a useless piece first to see the result after it dries. If the ratio is correct, there shouldn't be a visible white glue texture when dried.)
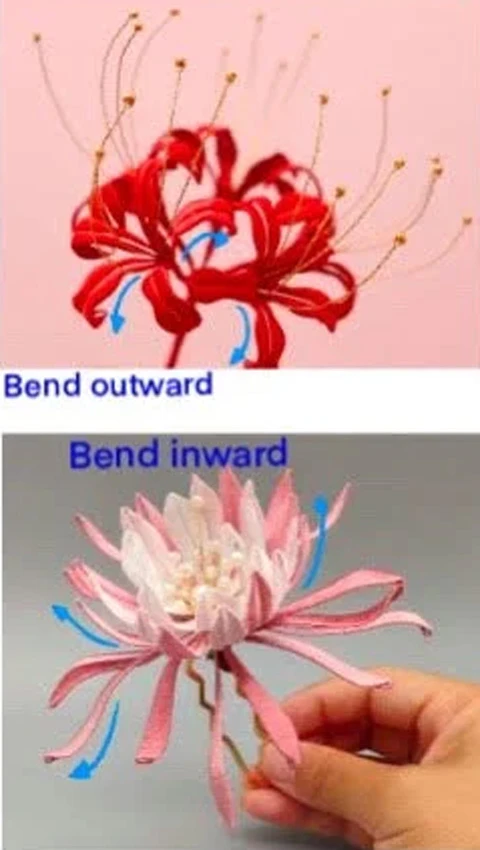
- For those who want to use tweezers to bend the shapes a little bit, creating petals that curve inward or outward, add a thin coating of watered-down glue to the backside of the piece. Wait until the piece is half-dried, then use the tweezers to slowly bend the shape in the desired direction. Bending the shape when the glue is half-dried helps avoid cracks forming on the glue surface, ensuring that the bend you made will last. If you bend the shape when it is completely dry, you may need to add more layers of watered-down glue.
- How you apply the glue entirely depends on your preference. Some people bend the piece with their fingers first, then apply glue to the entire back surface while it is still in shape. Others prefer not to add glue at all and manually bend the pieces. Some like to add enough glue to each piece's surface before putting everything together.
- At this point, some people may also add glitter or gold foils to enhance the flower's design and make it even prettier.
Shaping Pieces
When it comes to ronghua, there are preferences for either the luffy kind, which is the classic type that dates back to ancient China, or the more modern type, which involves using a hair straightener to smooth out the fluffiness. With the flat surface, you can use different tools and scissors to cut out specific edge shapes for each petal instead of having them as curved ones.
But for wrapped flowers, the shapes are determined by how you cut the cardboard pieces before you start wrapping. If you want the flower petals to have a bumpier curve or smoother curve, then you need to cut them out in that shape right from the very first step.
Wrapped flowers also have some limitations in how you can bend each petal to form a shape. When it comes to flattened ronghua, you can use a small iron to create curves in different directions at the tip of the petals, but for wrapped flowers, there is cardboard within the threads, so the most you can do in shaping wrapped flower pieces is to bend them and then apply glue.
Combining Parts
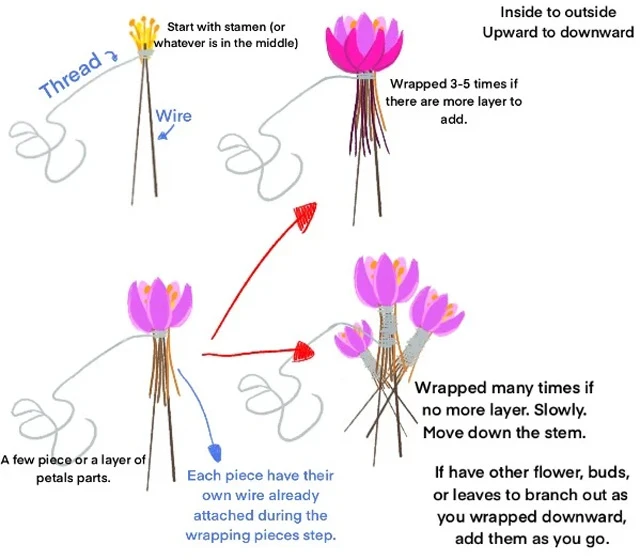
Combining parts for wrapped flowers follows some of the rules of ronghua. According to the ronghua rule, combining starts from the stamen, then moves to the inner petals, outer petals, and leaves, going in to out and up to down. This same rule is applied to wrapped flowers.
- If starting with a batch of stamen, tie them with a few loops of thread and consider adding a thin layer of glue for stability.
- Alternatively, if you only need a few stamen, wrap them around a piece of wire to create the basic stem for the flowers and leaves.
- Take thread in the color of the stem or branch, and wrap it around the stamen, enclosing them onto the wire. Then add the first layer of inner petals. (Beginners may find it easier to start with 2-3 parts, positioning each petal carefully and wrapping 3-5 times.)
- If there are multiple layers in the flower, wrap 3-5 times until all the inner pieces are attached. Overall, wrapped 3-5 times more over the entire layer, before moving to the next layer.
- Continue the same process for each subsequent layer until you reach the outermost layer of flower or leaves (if the flower has leaves beneath the outer petals).
- After wrapping the entire flower, wrap the thread down from the flower/leaf to the stem of the wire. The length of the stem can vary depending on personal preference and use (e.g., hairpins or clips).
- While wrapping the thread down the stem, ensure you smooth/straighten out the thread to cover a larger area on the wire (you should be doing this as you wrap). This will avoid creating a bulky stem.
- When you reach the end point where you preferred, do a slip knot, cut, and glue or use a lighter to briefly go over the end to secure the end of the thread.
- If you want to create the appearance of a branch with multiple flowers, follow the same combining method as before for each complete flower. Once all the flowers are individually wrapped, begin attaching them to the main stem one by one as you loop the thread downward. This way, you can create a beautiful branch of flower.
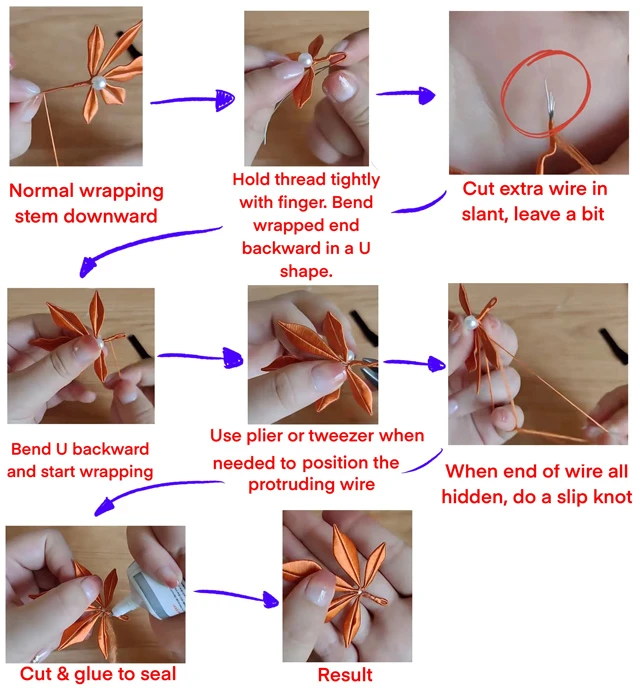
Some people preferred to have a loop at the end of their result that allow them to attach some tinsel or beads when wanted. For this second type of end securing, you follow these steps;
- Follow the usual step of wrapping the thread down the wire.
- When you determine the length of the stem you wanted to end, use fingers on one hand to hold the thread straight.
- Use a hand or a tweezer to bend the lower part of the wrapped wire into a “U” shape.
- The end of the U shape should be on the backside of the overall product, so it is more easily hidden.
- Use a scissor to cut the extra protruding wire with a diagonal slant. Only leave some left.
- Pressed the end of the wire to the backside of the wire – or if your wrapped stem is short and ends up bending behind the flower – or the backside of the flower.
- Start wrapping near the end of the U to close the U gap, leave a small hole where the U bends, this will be where you can attach tassels, etc.
- You can use a plier or tweezer to reposition protruding wire when needed.
- Wrap until all the wire ends are hidden from sight, create a slip knot and cut the thread.
- Use glue or a lighter to seal the end of the thread.
- Reposition flower, petals, beads to the position you wanted.
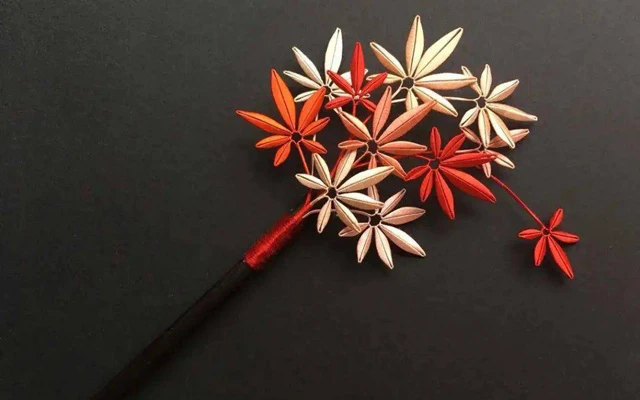
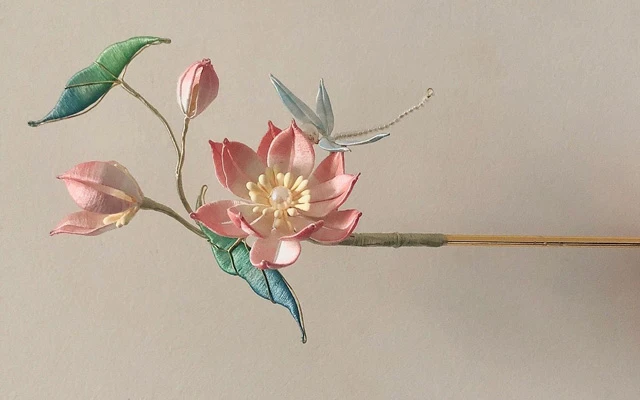
Attaching to Hairpin/Clips
To attach to hairpins, you follow a similar wrapping method to attach the end of the stem or branch to the hair stick/comb.
For hair clips, people usually go by hot gluing the backside of the product to the surface of the hair clip, but you can also follow the classic method of wrapping threads.


very beautiful, i want to try
Bookmark, awesome ronghua tutorial!
Great article👍