Vocabulary
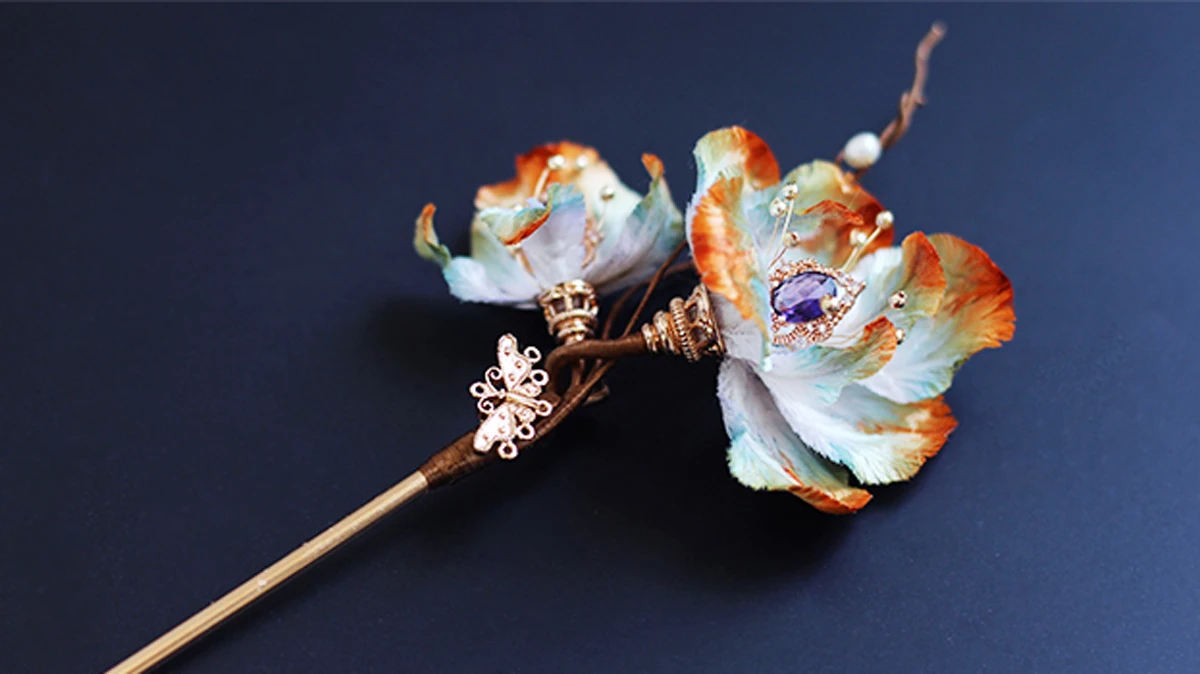
Velvet Flower - 绒花 (rónghuā) - a realistically made flower made artificially from silk threads and copper wire.
Palace Flower - 宫花 (gōng huā) - another way to call ronghua with the rise in popularities of ronghua to females in the palace.
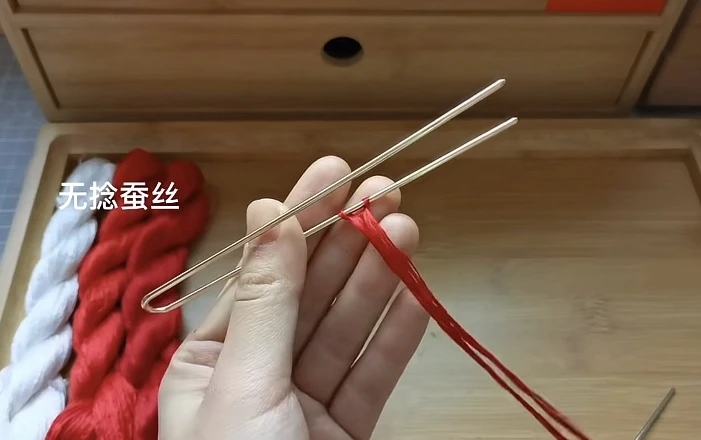
Untwisted Silks - 无捻蚕丝 (wú niǎn cánsī) - when it comes to silk threads, depending on the type and material of the threads, one single thread can be made up of thinner threads twisted together. Untwisted silk thread means there are no smaller twisted threads. You can directly skip to the brushing steps in ronghua making process.
Hunan Embroidery Thread - 湘绣线 (xiāngxiù xiàn) - another type of thread used in ronghua making.
Suzhou Embroidery Thread - 苏绣线 (sūxiù xiàn) - another type of thread used in ronghua making.
History
绒花, rónghuā, an artificial handcraft head accessories made from materials such as silks and coppers. It existed since the Qin Dynasty. There are many known “brands” of ronghuas, such as Nanjing Ronghua. In the Tang era, Wu Zetian listed Nanjing Ronghua as a royal tribute to the Yangzhou area becoming a luxury only princes and princesses can use. Eventually, Nanjing Ronghua became something that represents Nanjing but also Nanjing's handicraft culture. But no matter what name ronghua is attached with, it is still homophonic for “glory (荣华, rónghuá)” and has a meaning of happiness and beauty “美好 (měihǎo).”
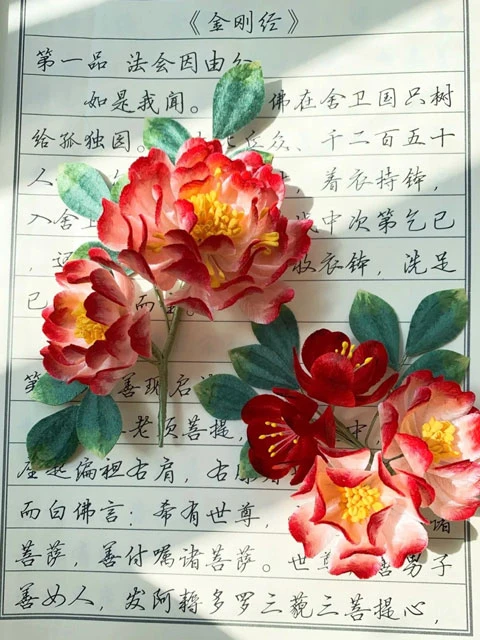
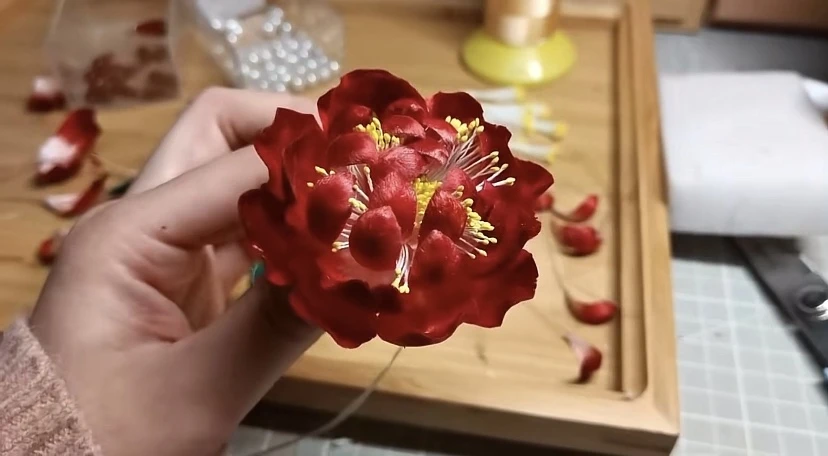
The reason why ronghua is worn is due to the limited blooming period of real flowers. Real flowers are an option, but the range of selection will be limited due to different flowers only blooming in specific seasons. Additionally, there will be the withering period after it is plucked. By then, petals and leaves will be falling all over, creating a rather troublesome mess. Ronghua on the other hand is able to replicate the vibrant colors of a flower, animal, or an object and is not limited to seasons. Royals will have the option to choose from a wide selection to match their outfits. For example, peony is one of the flowers that ladies in ancient times liked quite a lot. But that flower has a short flowering period and withers quickly.
Ronghua also serves as a simplistic decoration for the royals on a daily basis. While most Chinese dramas show the royals in the palace fully decked out in lavish accessories and outfits, there are still days when they can wear something simple when they don't have to attend special events or courts. In this case, ronghua will replace a head full of gold, jade, and emeralds for a more easy put-together look that is still able to present one’s status and beauty. Besides being worn on the hair, it can also be tucked behind the ears.

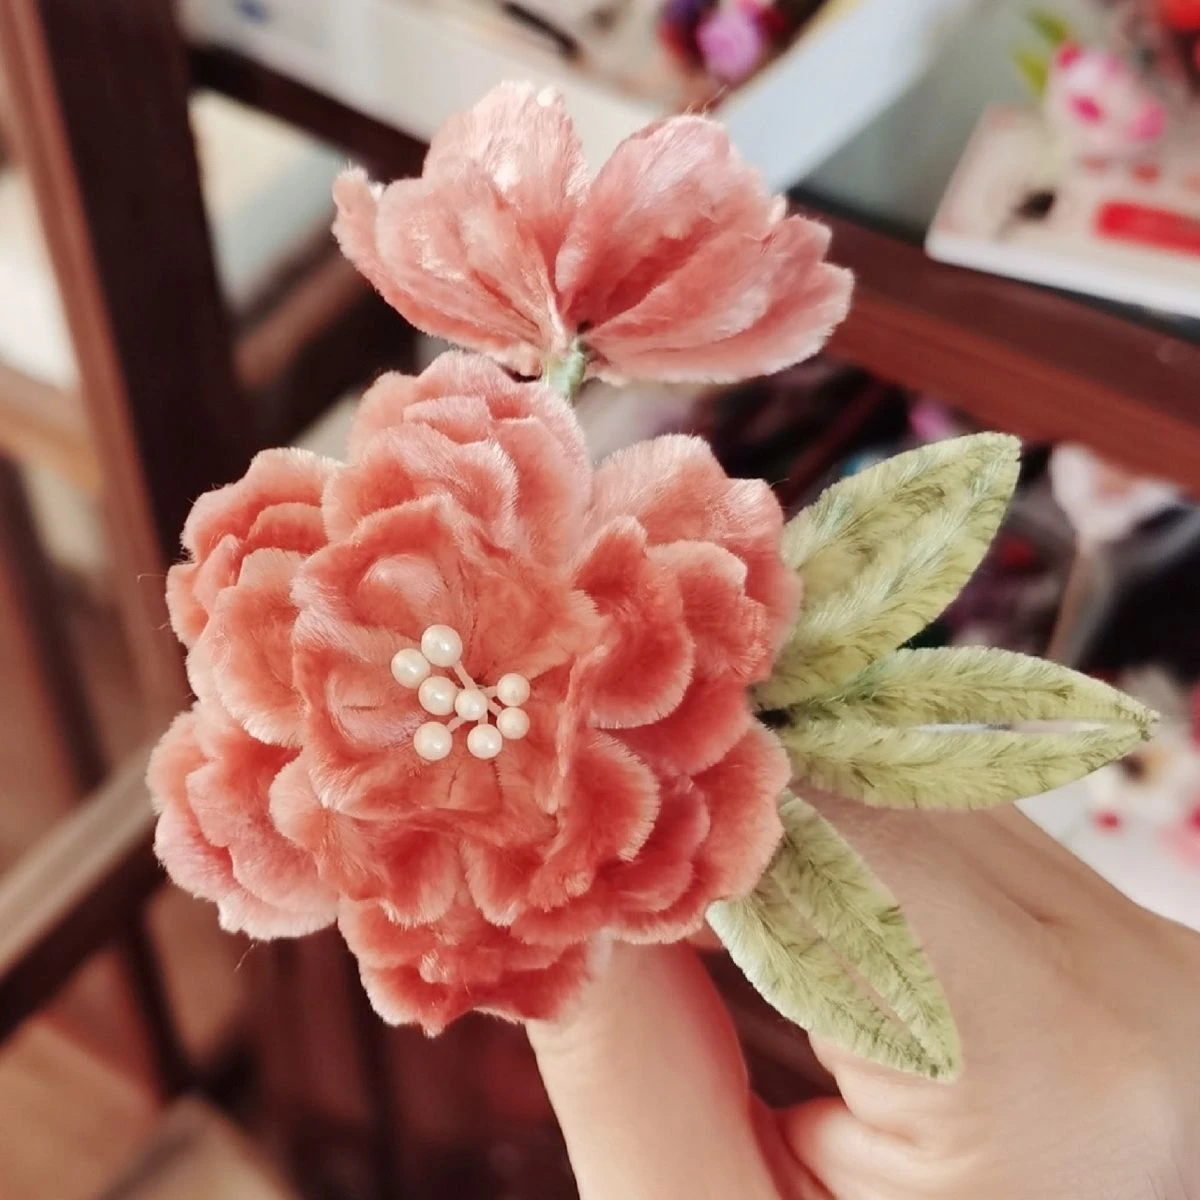
Not only were ronghua liked by royals, they were also liked by the female servants within the palace. The colors used for ronghua are either bold and vibrant or girly with bright red (大红, dàhóng), water red (水红, shuǐ hóng), and peach red (桃红, táohóng) as main colors then with yellow stamens and green for the flower's details. Sometimes there are also subtle gradients at the end of the petals to make it look more lively. And with the popularities of ronghua in the palace, another name for it emerged, called “宫花 (gōng huā),” translated as "palace flowers," a flower in the palace.
When using different colors for ronghua making, there is no need to be afraid that the colors might be overly vibrant or bold. This all lies in the techniques to control the amount of each color used. Those who are unable to control each proportion of colors will end up making the result tacky. Ancient Chinese who have a good understanding of how much areas each color should take on a ronghua and how there should never be two similar-sized areas with contrasting colors will raise the chance of producing pleasing results.
Ronghua is not only limited to making head accessories. Some other products that are also made from ronghua include brooch flowers, Ruyi, phoenix crowns, dragon boats, red-crowned cranes, and Nippon lily.
So when is ronghua worn? If following ancient Chinese custom when ronghua is available to everyone instead of just the royals, it is connected to the phrase “一时三节, yīshí sānjié.” Meaning there is "one time and three holidays" in which females will be wearing ronghua. The "one time" (一时) will be on the marriage ceremony day for the bride. The bride will wear this with other accessories for their wedding and the ronghua will represent the meaning of "living the rest of their life in prosperity and wealth (荣华富贵, rónghuá fùguì)." Then the "three holidays" (三节) will represent three types of holidays in Chinese culture - Spring Festival (春节, chūnjié), Dragon Boat Festival (端午, duānwǔ), and Mid-Autumn Festival (中秋, zhōngqiū).
While technologies have advanced enough to this day, ronghua is still something that machinery can’t produce. Since the Ming and Qing Dynasties, people were given more accesses to advanced silk manufacturing techniques, but producing ronghua is still a cumbersome process. So till now, ronghua is still a handmade accessory with all the different steps that need to be careful and paid attention to when making.
Types of Threads for Ronghua Making
There are three main types of silk threads used in ronghua making; 无捻蚕丝 (untwisted thread), 湘绣线 (Hunan thread), and 苏绣线 (Suzhou thread).
First, there is a difference between cooked and raw versions.
生丝 (Raw)
The texture of the strings feels like hair. Feels stiff because there is a glue-like substance on the surface of the thread since it’s not processed. These types of silk are NOT used for ronghua making.
For ronghua, you have to use the cooked version. Cooked the silks in alkaline water mixed with water to get rid of the glue-like substance on the surface.
Suggested to use natural silk for ronghua making.
煮丝 (Cooked)
After cooking, the silk will be softer and fine, which is then used for ronghua making.
无捻蚕丝 (Untwisted silks)
- Comes undyed. Needed to dye manually.
- Characteristic is very similar to cooked silks compared to others.
- The fluffiness or “velvet textures," translated from “绒感 (róng gǎn)” after brushing and made into strips will be finer.
- There is no need to split tinier threads from one thread. You can skip to directly brushing.
- The shininess of the threads is also excellent.
- Each thread is distinct. Not easily blurred or tangled together.
湘绣线 (Hunan embroidery threads)
Hunan embroidery has three types; normals, threads slightly twisted, or threads not twisted at all. Normal is suggested for beginner. After you get used to it, you can try other versions.
- Hunan embroidery threads are made from natural silk.
- One thread is usually made up of two twisted thinner threads.
- One thread is quite thick so it is convenient when untwisting the thinner threads from it.
- Shininess of threads is medium.
- No need to dye threads.
- Length of Hunan threads is slightly shorter than Su and untwisted threads.
- One Hunan thread can replace around 5-6 Su threads.
- It is a bit more difficult to brush the silks. Can easily knot or threads will come off in balls.
- If you want to make fluffy types of flowers it may be more difficult.
苏绣线 (Suzhou embroidery threads)
- Raw material is also natural silks.
- One thread can be untwisted into two thinner threads.
- The shininess of thread is better than Hunan threads. Also richer in colors.
- Threads are thinner, so when untwisting threads, you may need to take more time.
- Easier to brush through.
- The thinner thread leads to finer and smoother products.
Then there is also the threads that you buy from differnt places. If you buy from different websites or store for similar threads, their shinenss, fineness, and smoothness when brushing also differs.
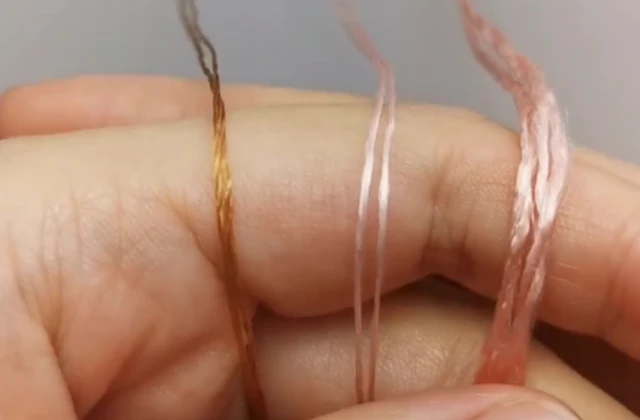
Image from 望余成 on BiliBili; (Left to right; Suzhou embroidery thread, untwisted threads, Hunan embroidery thread)
Ronghua Making; (General Steps)
Materials
- Silk threads, either dyed or undyed.
- Containers (for undyed silks.)
- Dyes (for undyed silks.)
- Stirring tools (for undyed silks.)
- Scissors.
- Pencil, chopstick, or a clothing hanger (use the bottom), anything to tied batches of threads on.)
- Large Clip.
- Medium or soft bristled brush. (纳米刷, nàmǐ shuā.)
- Hair flattener.
- Artificial flower ironing machine (optional). (烫花器,tàng huāqì.)
- Copper wire can be silver or gold (Suggested 0.2-0.3 thickness.)
- Talcum (滑石粉, huáshí fěn) or chalk powder, any powder to help with frictions.
- A block, or anything with a flat surface that fits in your hand for tightening the wire clamp. Can also use the tool made specifically for it known as "roller board" translated from 搓丝板 (cuō sī bǎn.)
- White latex mixed with water or hairspray for securing finished shape.
- Tweezer.
- Hot glue or glue.
- Hairstick (if you are attaching it to hairsticks). Can be other tools that ronghua can be attached to.

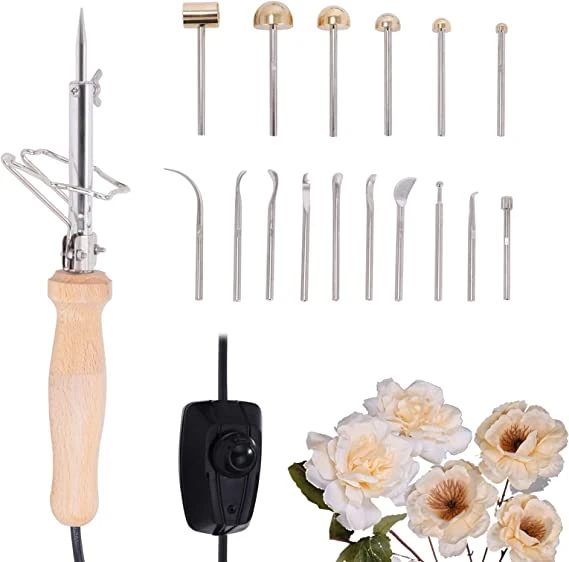
Images taken from @酱酱小掌柜 on 小红书. @云动手作,@慕容意的手工小记,@雪胖, and @居延(教程号)on 抖音. Rest from Google.
Steps
1. Silk Thread Picking (挑丝, tiāo sī)
What type of silk threads you’re using and how they are processed before you start any other steps are important if you want to show the best result based on your preferences.
Different silk threads have different positive and negative sides to their characteristics.
- For thinner threads, you’ll have to use more per batch.
- Thicker threads, you don’t need to use as much per batch.
- Shinier threads make your end result more radiant.
- Some threads are able to 'fluff' out more making the result look finer and smoother and a closely compacted result when observing the details.
- Then there are threads that are more easily tangled or come off in balls during the brushing process. Some threads might be easier to snap in half and slow your progress.
- For beginners, any type of thread will work, because the handcraft skills of making them are also important to learn through practice.
Many nowadays would directly buy dyed threads from stores. In that case, you can only pay attention to the reviews or try the quality yourself. But the positive side is that they get delivered dyed so you can skip the beginning process.
Some preferred to start from scratch, which is buying batches of white, original silks and personaly dyeing them. For beginners, this can be quite troublesome if they are unable to control the amount of dye used and end up with too vibrant or dark of a color.
2. Dyeing Threads (染线, rǎn xiàn)
If you bought the silk threads in their original form, then the first step is to prepare a pot of boiled water. Normal water will do, but some suggested alkaline water.
- Soak the white threads in normal-temperature water for 15-20 minutes.
- Prepare your dyes in separate containers with enough space for batches of threads (When it comes to dyes, always add a little at a time to make changes to the depth of colors).
- Pour hot water into each container. Mix thoroughly.
- Take out the silk threads from the water and wrenched the water out.
- Dip batches of silk threads into containers with dyes for around 3-4 seconds.
- Prepare a new bowl of cool water to rinse the threads. Repeat a few times.
- Wrenched the remaining water from each batch and tie them up in a secure loop to dry.
3. Unfolding Threads
Now the steps caught up with the threads bought directly dyed from stores.
- If you bought the threads from the store, they will usually have one or two thin threads tied at the midpoint of the entire batch and twisted in a long pretzel shape. Unfold the batch once to expand the twisted batch, and unfold again by finding the tied part and spitting the batch open to form a circular/oval shape. Snip the part near the thread that tied together the batch.
It’s an optional step. If you want longer batches to comb through then you don't need to snip it into shorter parts, but I don’t think making a ronghua will use up the entire batch of threads. Doing this might tangle the silks much easier. Some stores use different tying and packing techniques, so maybe your thread won’t be in a twisted pretzel shape.
- For home-dyed threads, you follow a similar step. This step is just to pull out a portion from the overall batch that you will be using for ronghua making, and using the scissor is to shorten the length to the amount you needed.
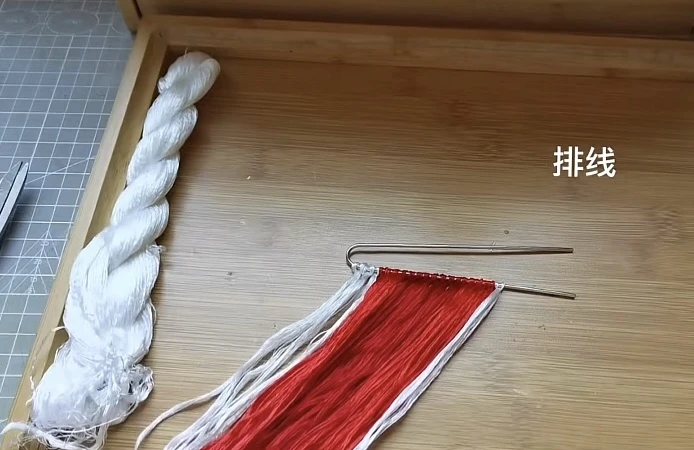
4. Grouping (排线, pái xiàn)
Now, you start grouping each thread into a batch and tie them securely to something that can help you pull one end of the threads.
- One batch usually will go with 3-5 threads.
- How many small batches you made lined horizontally depends on how long you want each strip to look, and each strip will generally be used to make one piece of the overall flower.
- Batches will be tied in a secured loop on a pencil or chopstick.
- Make sure the ends of the batch have similar lengths.
- The chopstick will then be secured by a large clip to an edge so you don't have to hold the top end while you work on the remaining part of the threads.
This step can change order with Step 5. Some people preferred to use the silk thread as it came as and group them in batches then split the threads, others preferred to splitted the threads then take the thinner threads and group them. This also depends on the type of threads you used and if you want a thinner, flatter result that uses up less threads or fluffier effect.
5. Splitting Threads (劈丝, pī sī)
- Now you will start splitting each thread. As in untwisting each thread if the silk thread you use has thinner threads twisted together to make one thread. This is so that when you are brushing them later, they won’t easily get tangled up. This step takes a lot of time and requires patience.
- Some threads do not have thinner threads twisted together. If so, you can skip this step.
Silk threads used in embroideries follow similar steps. But instead of grouping them into batches, they untwisted thinner threads from one thread and used that thinner thread to start sewing. The thinner the thread, the more fine and smooth the overall presentation of the work will look.
Chinese embroiderers also used thicker threads in their original form or untwisted them and then twisted together a few of the thin threads so it’s slightly thinner than the original to use for sewing. The thicker the thread, the more bumps and details on the work it is visible to be seen. Sometimes that’s the exact effect they are looking for. Another case would be where they take a thin thread and twist it together with another thin thread of another color. That way, when it’s used as one thread for sewing, that thread with two colors will add small interesting details to the entire work.
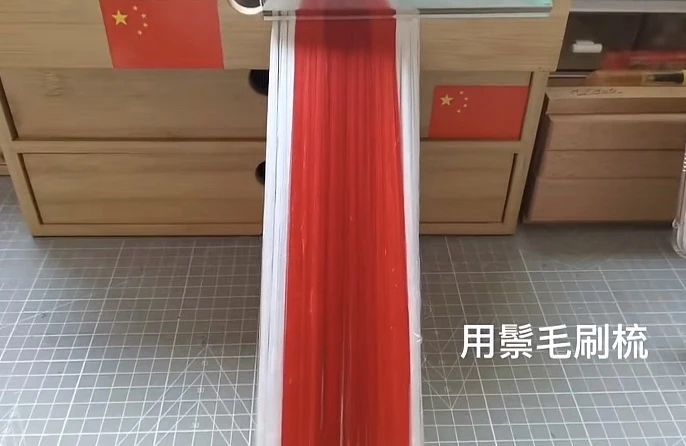
6. Brushing Velvet (梳绒, shū róng)
After you finish untwisting the threads, you can start brushing through them.
- You can just directly brush the threads or use a silk softening spray to make your brushing process much easier and lessen tanglings and breakages.
- Pull on the other end of the batch that is loose. The threads will be straightened from the pull.
- Use a medium or soft bristle brush to comb. Start from the bottom of the thread where you are holding and slowly move upwards. Suggest you brush each small batch tied to the stick one at a time, or a few groups at a time, to prevent too many threads from tangling up together when brushing.
It’s suggested that you use a soft or medium bristle brush. If you use a hard one it might cause more threads to snap or pull out the threads as you comb downward. Mediums will help you brush through with enough strength but not break. A soft brush will have less strength and may be repeated brushing in one area but at least you can prevent breakages.
- After you brush thoroughly on the end you grabbed, move upward to the tied end of the threads.
- Do this to all the batches if you split them into portions for brushing. Then combine the batches and brush the entire silk threads.
- The result will look like the threads are smoother and slightly fluffed. The silks will seem like they have more shine and texture to them. And will be slightly hard for you to tell the difference where one thread is when compared to an unbrushed thread.
(Optional; you can use a hair flattener and flatten the fluffiness as you move to the next step.)
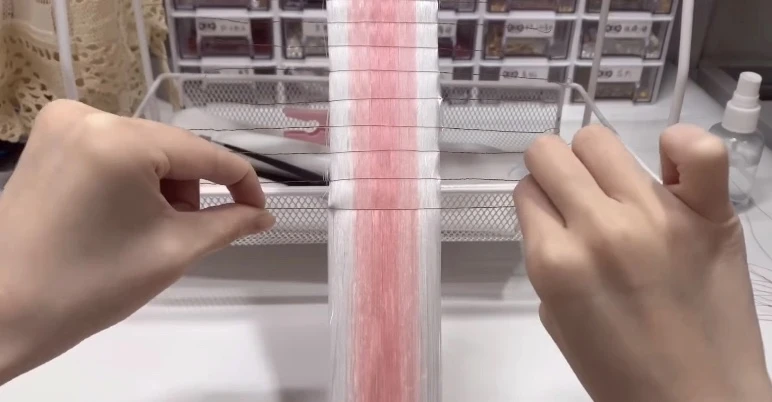
7. Copper Wire Securing (拴绒, shuān róng/绑绒, bǎng róng)
After you finish brushing the threads, you then use thin copper wire to start securing the threads into strips that you will be cutting out.
In a more traditional process, the copper will be harder to twist using fingers, so before this step, they will also have to soften each wire over a fire before using a tool to bend and twist the wires over the brushed silks. This step is known as "softening copper wire."
- To start, use another clip to secure the loose end so that the thread is now pulling straight without you holding onto an end.
- Cut two copper wires of similar length.
- Sandwich the threads in between the copper wire. One behind and one in front.
- Using your fingers, pinch both ends of the copper wire and started twisting to opposite sides. By doing this, you will have equal twisted strength on both sides and won't cause unevenness or tightness from over-twisting on one side.
Make sure you’re twisting enough so that the wire won’t easily slip down the threads or allow the thread to move easily when you release your hold on it. But also do not over-twisting it or else the wire might start bending the threads along with it before you start cutting them into strips.
Continue to cut out similar lengths of copper wire and clamped them on the threads throughout the entire batch up threads. When the thread is full of wired clamps, you can start cutting.
There are some who prefer to have one long copper wire, fold in half, do a little twisting on one end, then sandwich the brushed threads in-between, then start twisting on both sides going opposite directions.
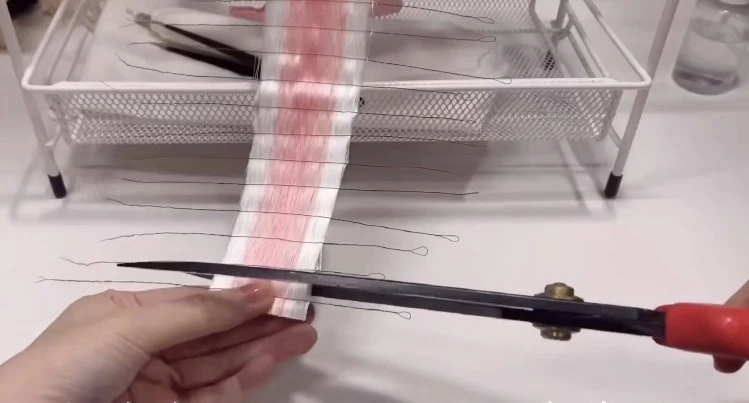
8. Cutting “Velvet Strips” (剪绒, jiǎn róng)
- Before cutting make sure each wire is twisted securely enough.
- Use scissors sharp enough for cutting cloth and threads. That way you don't have to repeatedly cut in one area and fray the threads. It's best if you can cut off one strop in one clean cut.
- Start at the bottom and slowly move upward.
The distance from the wire to the edge where you wanted to cut depends on what you are making.
- Carefully placing the cut-out strip on a surface to not mess up the threads depends entirely on the twisted wire to stay still.
- When you reach the top where the threads are tied securely at a stick, snip it off in similar length as other strips you did. The small portion tied to the stick is unbrushed so they are useless for later steps. You can toss them out or save them for something else.
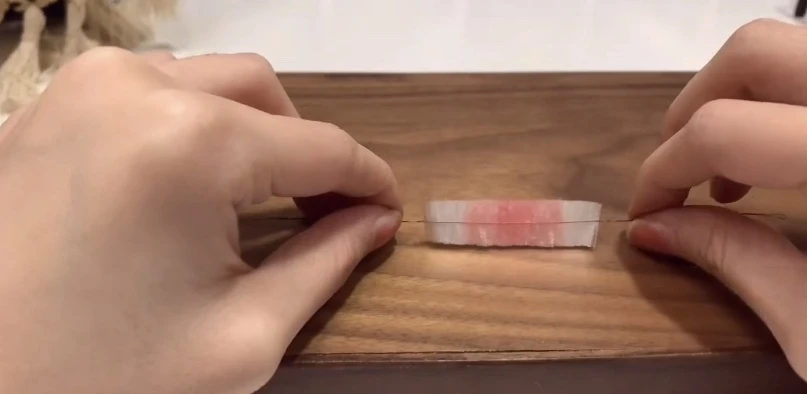
9. Straightening and Completing “Velvet Strips” (搓绒, cuō róng/搓条, cuō tiáo)
- Carefully lift one, and like what you would do to straighten the edges of the paper by slanting them and taping them against a flat surface, you do the same gently with each strip.
- Lift one, slant it so that the thread is perpendicular to a flat surface, then gently tap the edge to the surface to straighten any misaligned threads that shifted when you were cutting.
- Then you can tighten the wire clamp further. Grip one end of the velvet strips and start twisting on the other end. It’s hard for your finger to create enough friction, you can use a bit of talcum powder.
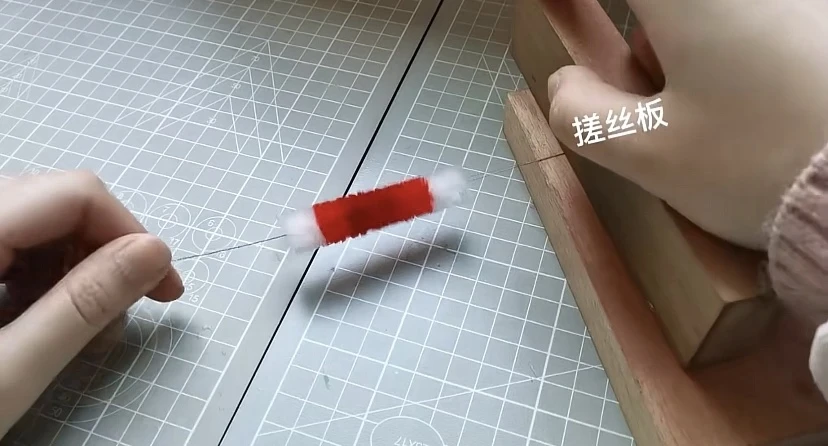
- This time when you twist the wire, the threads will rotate along with the wire. In the end, the threads will spread out in various degrees of rotation, creating a cylindrical shape of threads with the wire in the middle of this cylinder.
- Then you can move to use a tool to secure the twist more tightly than how much your fingers can. (the more you twist the wire the harder later on that fingers can't accomplish. So using a tool works best.)
- Place one end of the wired end on a flat surface. Use a block or something with a flat surface that fits in your grasp and start rubbing the weird part in one direction as you hold onto the other end. That block will help tighten the wire with some finishing twist.
- Make sure you’re not over-twisting the wire. The wire you used is thin itself, if you over twist it, you will just break the wire.
This is the completed version of what you called the “velvet strip,” the main part is where you start to use these strips to shape out flower petals and leaves to combine together.
Repeat this process for the remaining other strips until they are all done.

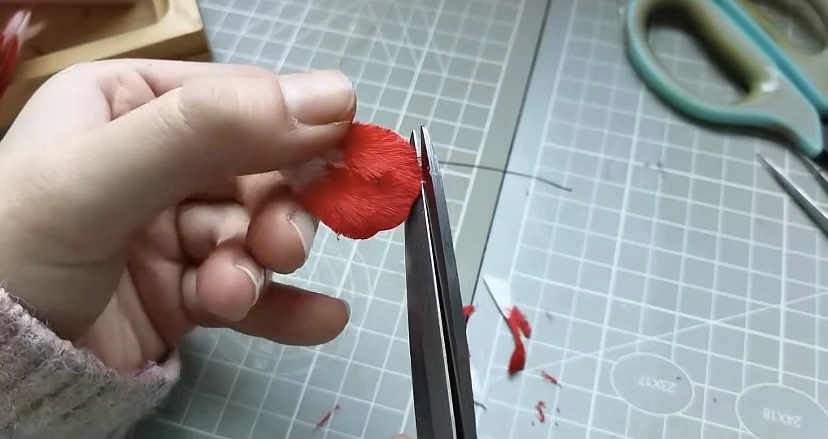
10. Sharpening (打尖)
The next part is 打尖, which directly translates as “sharpening.” You will use a scissor, and like how you imagine people using large scissors to clean the rough edges of bushes, you do the same to each velvet strip.
- Generally, when it comes to sharpening, you will only sharpen both ends of the velvet strip. The angle of the sharpness depends on what product you are making. This is for the top of the petal to be round when you bend the strip.
- Depending on the products, there are cases where you divide the strip in half and also sharpen the middle with two points. This is for petals or leaves that you want both ends to be sharper and the middle fluffier.
- Snip off a bit at a time in case you accidentally cut off too much from what you wanted. There are no techniques for this, only lots of practice and patience.
After you finished shaping you bent the velvet strip in half and twisted the wire part together.
- Bend the strip, intersect the wire (to decrease the small gap that exists when you bend the wire), hold the intersection which is also where the threads end with a tweezer as you use your finger to twist the two ends of the wire together.
- The strip will now be an upside-down water droplet shape.
- Gently brush off the excess cut-off threads that remained from your cuttings.

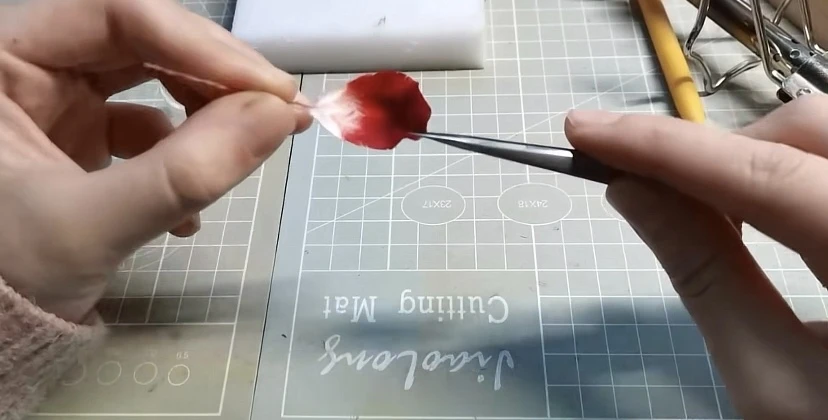
11. Petals Shaping
- If you are making a fluffy petal, then this is the product after bending and twisting the strip.
- If you are aiming for thin petals, then you can use a hair flattener, and starting from the wired part, iron outward/upward. Move in one direction to not mess up the threads, not back and forth.
- Repeat ironing a few times to get the thinness you want.
There are other ways to shape the strips into the pieces that you need to use for the products. These are just general shapes for making flowers and leaves.
- Afterward, you can use white latex mixed with water or hair sprays to secure the finalized shape.
- Pour the mixture into a spray container and spray them on each piece. Then use an ironer to secure the pieces again so it looks neater and threads won't easily fall off.
- Repeat the steps for all pieces.
12. Trimming
- Use scissors to clean the edges again for any small thread that is misaligned or jutted out when you work on bending and twisting the strip.
- Repeat the steps for all pieces.
- If the flower‘s petals you need aren’t curved edges but wavy edges, you can cut them out after trimming.

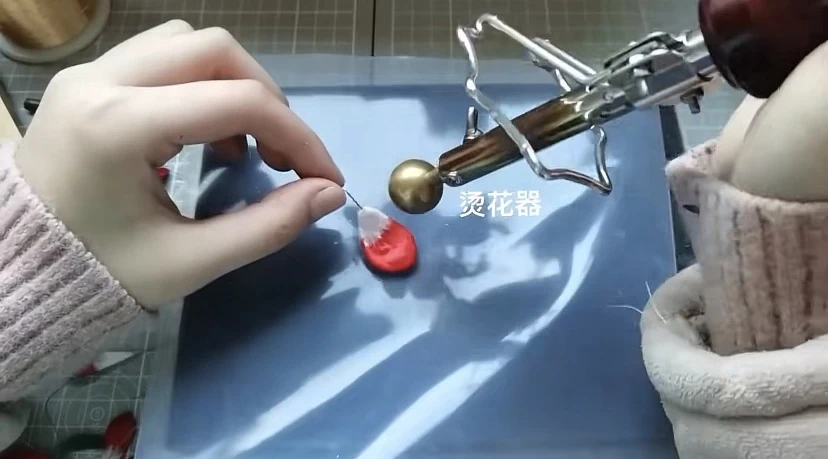
13. Petal Shaping 2 (for ironed thin petals pieces)
Besides certain flowers having wavy edges on their petals, there are also petals with curves instead of just bending one way or straight petals.
In this case, if you want to have small degrees of bends or curves in the middle or the edge of the petals, you will need to use a ball-type ironer that is specifically used to iron flower shapes, NOT for hair. They are called “烫花器 (tàng huāqì),” which directly translates as “hot iron.” But you can search for “artificial flower ironing machine,” it’s the same machine used for making heat shrink plastic flowers. There are different sizes of balls that can create different-sized curves for each petal.
This type of ironing machine is used for already ironed thin pieces of petals. Not sure if it works on the fluffy type of petals because those are originally aiming for the fluffy and small-sized effect, which doesn’t give much space for bending the wires into shape or ironing them into shape.
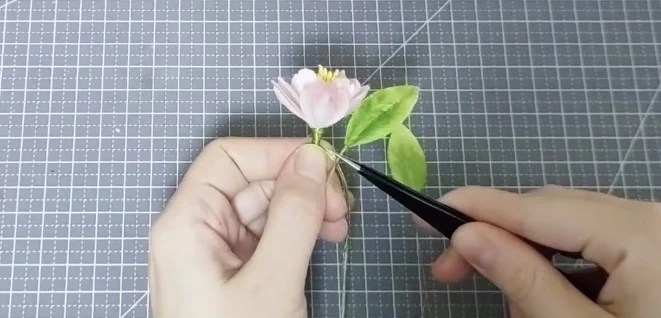
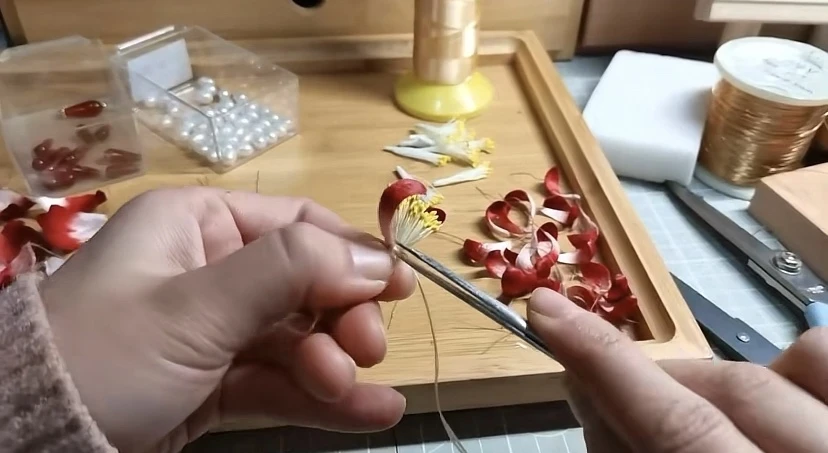
14. Putting Together (传花 & 摆造型)
Now, the finishing step is called “传花 (chuán huā),” meaning you are now putting together the finished pieces into a finalized flower or animal shape. “摆造型 (bǎi zàoxíng)” means when you finished putting together the flower, you are using tools to finish fixing the angles and curves of the pieces.
- You will be binding from inside outward. Whatever pieces will be in the inner of the flower such as flower bulbs, seeds, or flower stamens will go first.
- Use a tweezer to lift one piece at a time. You will use your hand to grab the lower-wired part of each piece. The reason for using tweezers is to prevent your finger from rubbing against the finished pieces and causing threads to shift or jut out.
- Start with two pieces and use a thread color that will represent the stem. Fold the little starting end of the thread with the wire as you wrap over it and wrap a few times. Generally, you just need to wrap it 2-3 times before adding pieces.
- Then use the thread you are pulling to tie a secure knot. It’s quite similar to a crochet slip-knot at the beginning step. If you are still confused about how to knot with only one end of the string in your hand, you can search online.
- Add in one more piece. Wrapped the threads tightly around them 2-3 times.
- Pull to tighten the string to not have loose wraps.
- Repeat this process as you move outward to the flower petals and leaves.
- If you add leaves, it’s suggested you wrap the threads down on the wire a bit then add the leaves. That way there is some space between the end of the flower and the leaves, showing the green stems as well instead of having all the leaves crammed up under the flower petals. But, that all depends on the type of flower you’re making.
- Then if you want the stem to be slightly longer after you finish adding the leaves, wrap the threads downward a bit more.
- To finish, pull on the string to tighten your wrap.
- Use a scissor to cut off the end of the thread.
- Use hot glue or glue to glue the cut end to the rest of the stem to finish.
- If you have more than one follower you want to tie together in a batch or attach the flower to a hair stick, follow a similar tying method.
- After finishing putting everything together, use the tweezer to reposition each piece and its angles to the way you like.
Extras
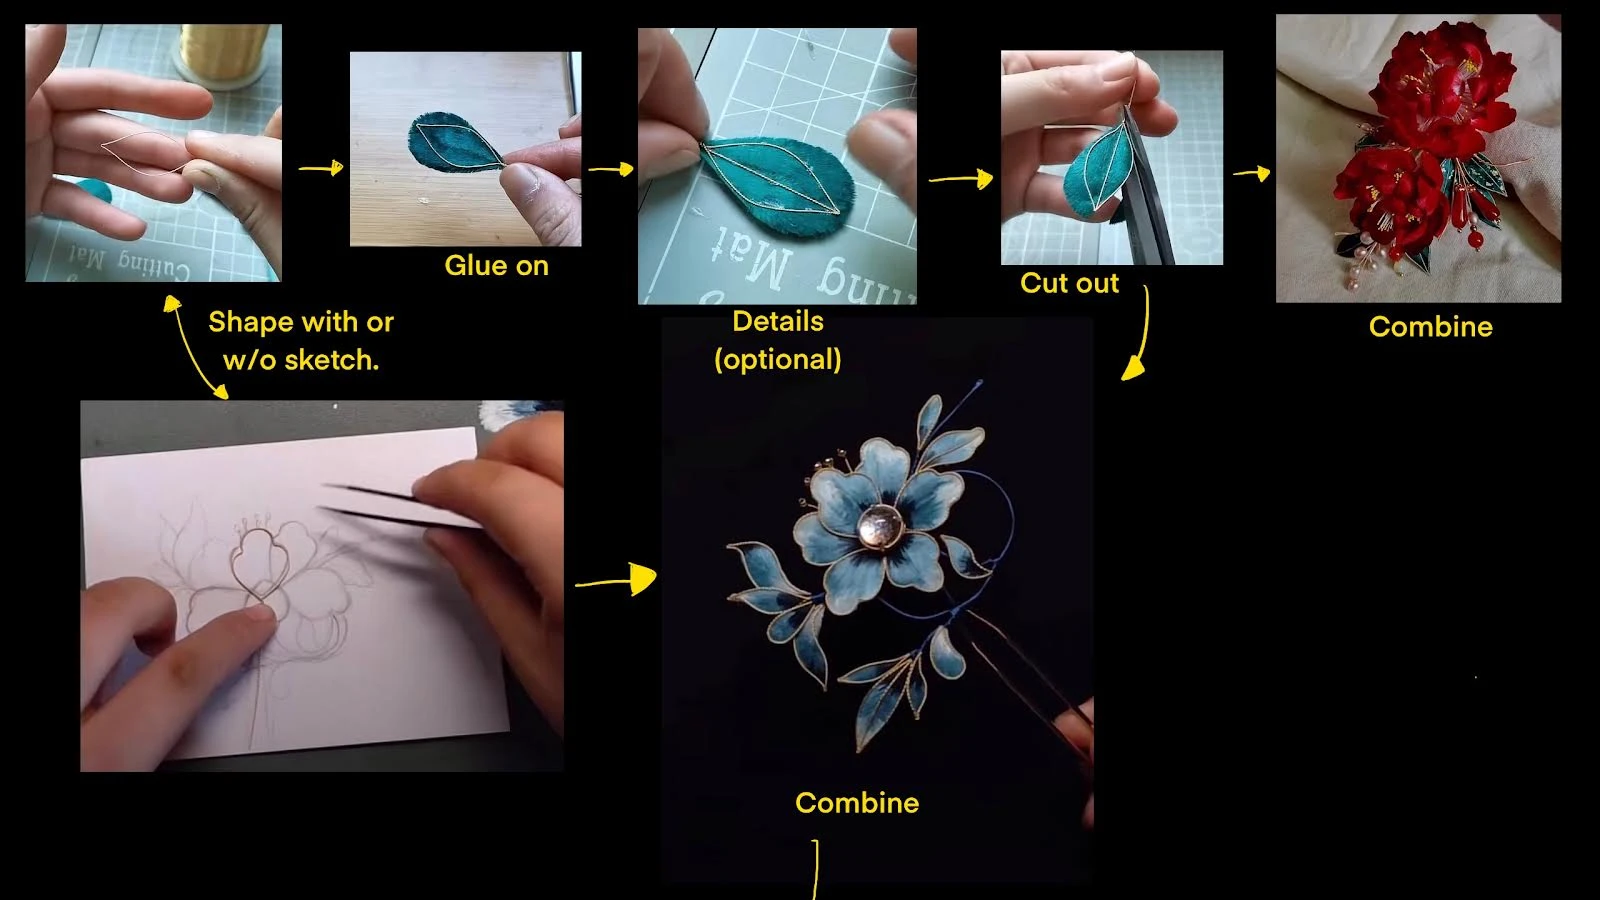
Leaves Making and Filigree Ronghua Imitation Tian-tsui (掐丝绒花仿点翠)
There is two general way of making ronghua leaves;
- Either you take a velvet strip and bend it in half.
- From the upside-down droplet shape, you trim and cut out the sharp ends of the leaves.
- Then bend the leaves to the angle you needed after putting together the pieces.
- Another method is when you take a strip.
- Cut the strip in half, or to the length you wanted the leaves to be.
Unlike the first method where you twist both ends of the wire together to one side, in this method you cut off one side of the wire, leaving only one wired end.
That wired end will be the one that helps you combine and wrap with other pieces.
- Use a tweezer to brush off any loose threads.
- Use hair flattener, starting from the wired part and iron outward/upward.
- One flattened to the thinness you want, spray on hairsprays.
- Wait until it dries, then use a scissor to cut out the leaf shape.
This method can also be used for smaller petals that bending the velvet strip won’t create.
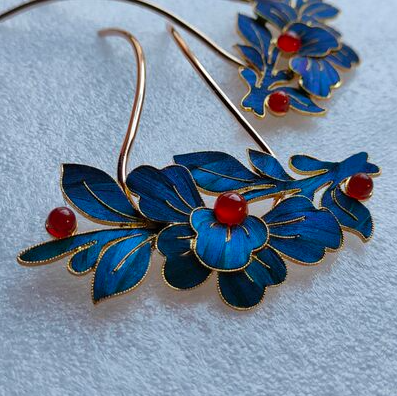
As for Filigree Ronghua Imitation of Tian-Tsui, you use more wires and glue on top of the bent velvet strips.
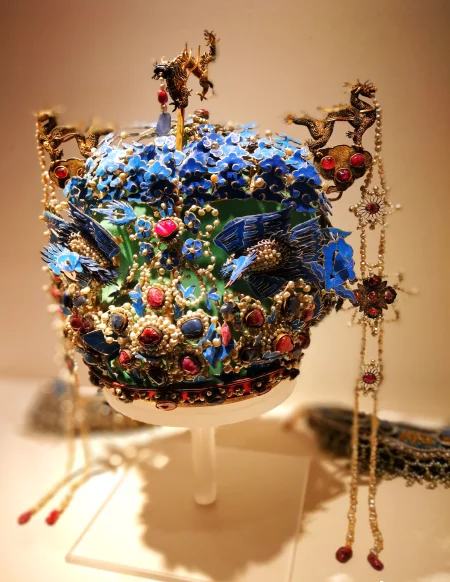
Tian-Tsui is made from kingfisher bird feathers which have an iridescent blue shade to them. It’s not only used in hairpins, headdresses, and earrings but also to adorn fans and other objects. The feathers are taken from the kingfisher bird and glued to metal frames that curved out each piece’s shape before combining. You can see a lot of this used on the empress' crown.
Kingfishers are rare to find and are now China's second-class protected animal, so things made from Tian-Tsui are nearly extinct. Another reason would be the craftsmanship of making Tian-Tsui has also dwindled over centuries. People have used other materials to create similar effects of Tian-Tsui. Ronghua is one of them. Besides just having iridescent blue feathers, ronghua not only can imitate Tian-Tsui but also provide a whole scale of silk colors for making Tian-Tsui.
- The first will be to take a velvet strip that is already bent, flattened, and hairspray.
- Take two copper wires and twist them together using the same board when you were twisting the wire a second time to tighten it.
- Now, you will need to have a sketched outline of the accessory shape you are making.
- Lay the twisted wire on top of the sketch, and starting from one point start bending the wire into the exact shape on the sketch. This step repeats for each piece that makes the entire headdress.
- Twist both ends of the wire together when they run back to the start.
- This will be the wired frame that you will glue onto the flattener ronghua pieces.
- Add glue to one side of the wireframe, and press it onto the flattened ronghua piece.
- Use something to press on top to add weight as the glue dries.
- When it dries, use a hair flattener to secure the shape and the glue to the ronghua.
- Then use a scissor to cut out the extra ronghua outside the frame.
- If you want to add details, such as shaping out the lines of leaves on a leaf piece, you can take one or two pieces of wire (twist for two), add glue to one side, and start from one area within the piece and slowly create the detail line you wanted.
- Use your finger to press down on the end you glued to prevent it from moving as it dries.
- Use tweezers to make small bends and angels on the wire as you work.
- Wait until the pieces dry out then combine them together.
For ronghua and Tian-Tsui, you can also create wired branches with beads to add decoration to an accessory that is entirely ronghua.

More about Hanfu accessory DIY:
Woah! I had no idea that so much could go into an accessory. I'd love to try and make some one day, and I'm certain that I'll be referring back to this tutorial when I do. Thank you!
Will probably be interesting with some accessories wire and scrap fabric 👀
Definitely!
Thank u so much😍😍
Welcome!
This is not healthy, I already have too many arts and craft supplies!!!^^
Doesn’t bother to get a bit more! LOL
Yeah, but then the cupboards starts protesting, it'll be a mess...
True! My storage box is already a mess with all my DIYs as well.
10/10! Waiting this tutorial for a long time, thank you so much!
Welcome!
Thank you so much! It makes me so happy.
You’re welcome!
the urge to do that!
Haha! Yep. Made me want to start stocking on silk threads and try myself when I was writing this.