A brief history of waist fan (yaoshan) and steps to DIY one for anyone interested.
Vocab
- Tuan Shan: moon-shaped fan, 团扇, tuánshàn;
- Zhe Shan: folding fan, 折扇, zhéshàn;
- Yao Shan: waist fan, 腰扇, yāo shàn;
- Ping Feng: screen, 屏风, píngfēng.
Introduction
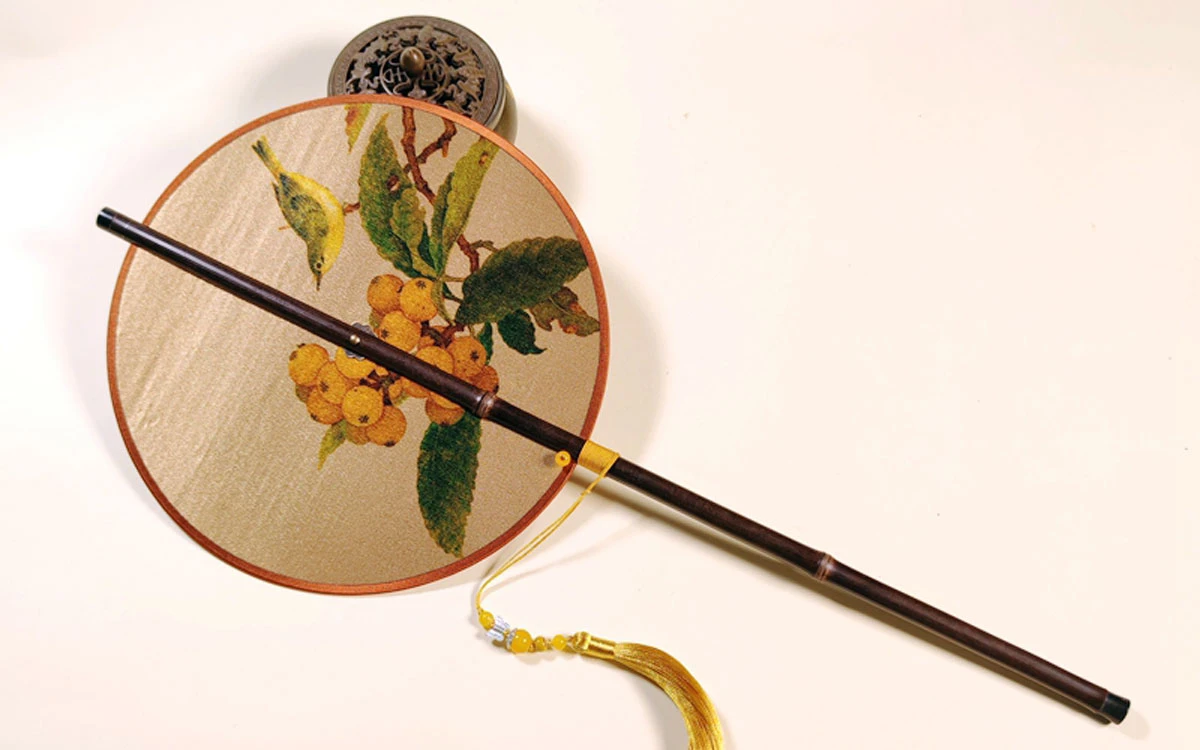
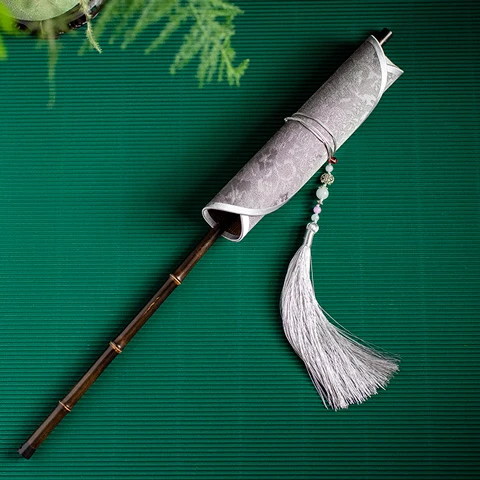
When it comes to hanfu, one accessory that it is paired with is a fan. Well-known types of fans are moon-shaped fan and folding fan. But there is another type of fan known as Yao Shan, which translates as "waist fan."
The reason why it is called a waist fan is that it can easily be secured at the waist when not used. When the fan is needed, you can just slip it out of the belt and open it up by twisting. It's unlike others where you will either have to constantly hold or unable to close it to take up less space.
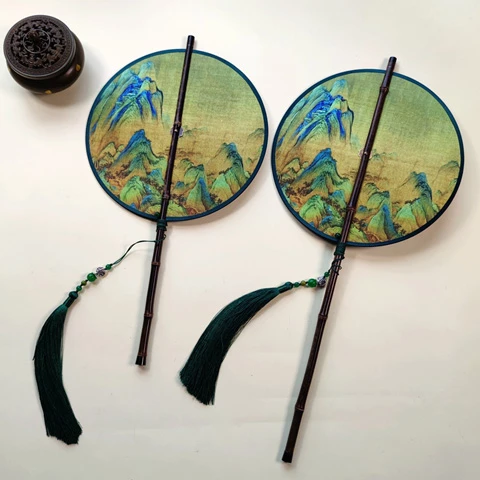
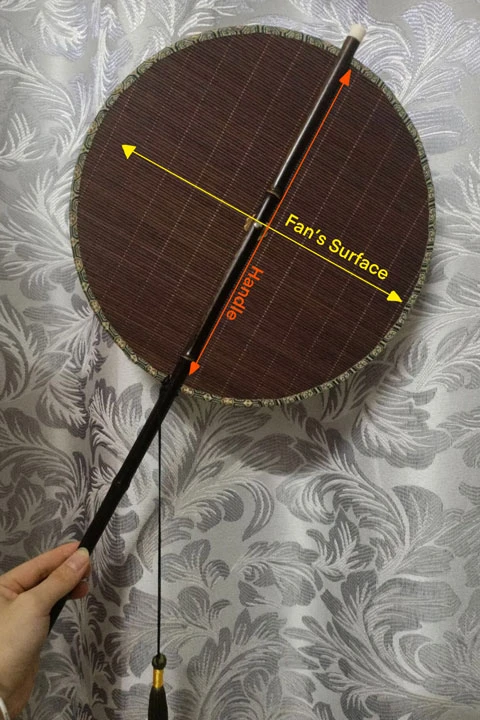
Waist fans contain characteristics from both moon-shaped fans and folding fans. It took the common round surface of a moon-shaped fan and the ability to close and open when needed from a folding fan. But the round shape is just a common shape everyone goes by. Moon-shaped fans have expanded from simply using a circle as the surface, so the shapes options also vary for waist fans.
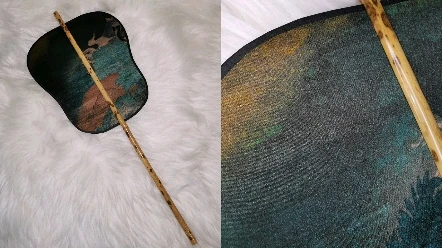
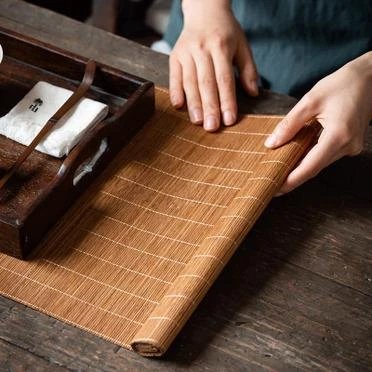
The fan’s surface can consist of one, two, or three layers. One layer will be made up of a bamboo mat. This played a crucial role in opening and closing the surface when it is rotated. The second and third layers of the surface will be optional. If any sort of color or design is wanted on the surface, just add a second layer consisting of a layer of cloth. So when the two layers are combined, one side of the fan’s surface will be a plain bamboo mat and the other will be a layer of cloth. If you want both sides of the fan to have designs, add the third layer with the bamboo mat in between.
Unlike moon-shaped fans where designs are embroidered onto the layer of cloth, the waist fan is just one overall cut-out piece. It just depends on whether the cloth you cut from already has a design sewn onto it.
History
According to few written records, people can only make assumptions that the waist fan is an accessory from Southern Qi Dynasty (南齐) or earlier. There have been records stating about some sort of "folding fan" (what the written records called it) that can be placed at the waist and ability to close and open at will. And since the characteristics of this so-called“folding fan” is quite similar to waist fan, many assumed that it is referring to a waist fan from the Southern Qi Dynasty.
元朝人胡三省作注:“扇佩之于腰,今谓之折叠扇。” - Yuan Dynasty Hu Sanxing noted: "Fan is worn at the waist, now known as a folding fan." Refers to Southern Qi Dynasty waist fans.
Moving back to Southern Qi Dynasty, there are also a few pieces of information pointing to the name of "waist fan" long existed since the Eastern Han Dynasty. Only during that era, it is called "要扇 (yào shàn)," literally translates as "wanting fan," instead of "waist fan." And "wanting fan" is said to have long existed since the pre-Qin period.
晋张敞《东宫旧事》:“皇太子初拜,供漆要扇青竹扇各一,纳妃同心竹二十,单竹扇二十。” - Jin Zhangchang's "East Palace's Old Events;" "During the Jin Dynasty prince's first worship, provide with laquer green bamboo fan each, twenty concentric bamboo when choosing concubines, and twenty single bamboo fan."
“Wanting fan” mentioned here represents a relatively large screen fan (屏风) serving as accessories to decorate the internal building structure. This accessory is fully known as “漆要扇 (qī yào shàn),” meaning lacquered fan, a fan with lacquer painting designs and coating on the fan’s handles (most likely only on the handle). And based on the records’ descriptions of the waist fan it can be assumed that it takes on the shape of a folding fan than we know of now rather than the waist fan with a round surface introduced here.
Image; (#1 Chinese screen. #2 “Wanting fan” screen fan. #3 Lacquered design on parent bone.)


The reason why it is called "wanting fan," is due to the fan narrowing at the waist (腰收缩, the handle where we grasp the fan from) and where all the fan’s bone intersects. That part of the fan is called "要 (yào)," thus may be the reason to being called "wanting fan." Later, the name "wanting fan" gradually changed to "waist fan (腰扇)." But the meaning is still the same. The part of the fan that is narrowed is known as "要," but it can also be considered "腰," to represent "waist," or "fan secured at the waist." That name was originally used to call screen fan decorations but later turned into a name for usable fans. Still, the main role of this "wanting fan" known since the pre-Qin era is simply just a sign or decoration in a room instead of a folding fan.
It can be named a lacquered folding fan (漆折扇) instead of lacquered waist fan(漆腰扇), but the folding fan is called wanting fan in ancient times for the name "lacquered wanting fan". I'm not sure either from the little information about lacquered waist fans and what it looks like exactly.
Even though there are assumptions about which dynasty waist fan emerged from and what it truly looks like if not the one that existed now, the waist fan that is introduced here is a physical fan matched with hanfus rather than a home decoration. And though there are only a few written records describing it and no murals or paintings showing how it looks in ancient China, it still left many imaginations for future generations. Thus, people referred to the descriptions from records to make the waist fan known now. And even though it is a fan created from information and pure imaginations, it still contains ancestral history passed down since Ancient China. It is simply created with new designs and integrated modern styles.
Still, even though it is considered a fan, it’s not the type where you use it harshly to create wind in hot temperatures. Not only waist fans, but other types of fans are also the same case. They may be a fan but act more as an accessory with hanfu than to bring cooling wind like a folding fan or a mechanical fan. If used too harshly it can be broken.
Image; (#1 Fan parts' names. #2 What laquerced fan might look like.


How it Works
To open a waist fan, you just need to rotate the fan’s surface 90 degrees. That way the fan’s surface which is made up of parallel bamboo sticks will be perpendicular to the handle. And due to the perpendicular crossings, it will act as a source of stability to keep the surface from curling close.
Depending on personal preference a bead and tassels can be attached to the second drilled hole at the edge of the fan’s surface. The bead acts as a stabilizer and stopping point from over-rotating the surface during the process of unfolding the fan. It also acts as a hook to loop the tassel’s string when closing the surface and keeping it close. If you’re still confused, see this as using the same method on an umbrella. Umbrella will have an extra piece hanging out with a button sewn on. When you closed the umbrella you also wrapped the extra piece around the body and buttoned it close to keep it from unfurling randomly.
To close the fan, you’ll just need to rotate the fan’s surface 90 degrees back. The bamboo sticks that made up the fan’s surface will be parallel to the handle. Then you can just roll up the fan’s surface and secure it close with a tassel or string that is attached to the fan.
Unlike other types of fans that usually have tassel(s) attached at the end of the handle, waist fans have the tassel attached at the edge of the fan’s surface. This is because it not only serves as a decoration but also a useful tool to keep the fan close when rolled up.
DIY Waist Fan (腰扇)
Tutorial pictures from @啊鱼, @小叮当叮叮当, @慢慢ayu on douyin. Rest from Google.
Materials
- Paper
- Bamboo mat (竹茶席) - usually placed under tea set
- Cloth (2nd layer and strips)
- Double-sided cloth adhesive tape
- Clips
- Jewelry glue/hot glue
- Tassels
- Bead
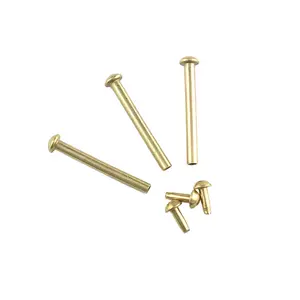
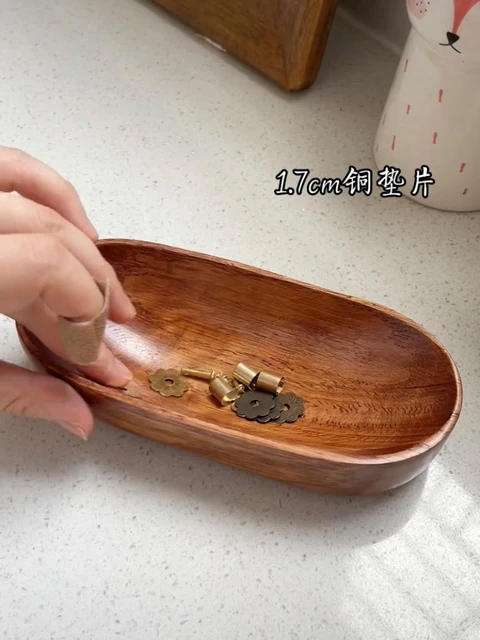
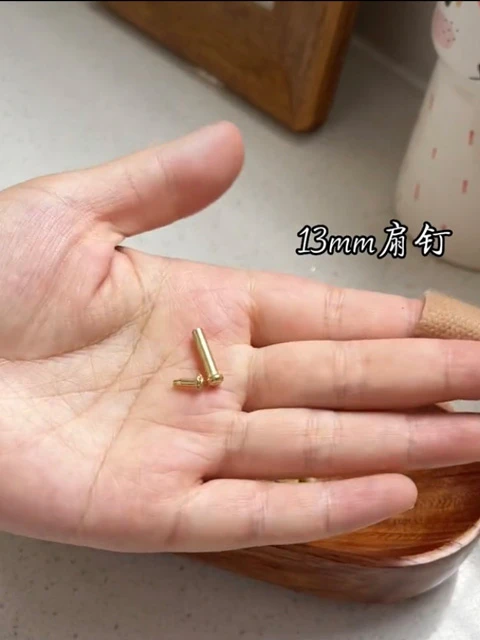
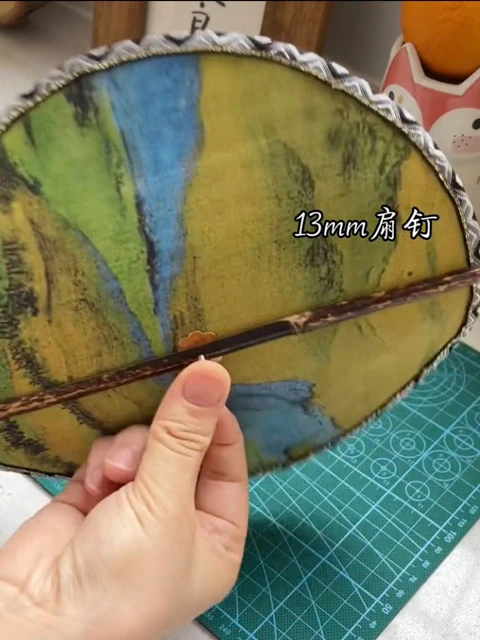
- Fan’s nails (13mm 扇钉)
- Fan’s copper disks (1.7 cm 铜垫片)
- Bamboo stick (less than 1 cm. Around 50 cm in length)
- Scissor
- Drill (or anything sharp to create a hole)
- Saw or small blade
- Sandpaper
- Hammer
Image; (#1 Bamboo mat. #2, 3 Fan’s nails. #4 Fans copper disks.)

Step 1; Chose Fan’s Shape and Size
Before beginning, choose the type of shape and size you wanted for your fan’s surface. The common style is circles, but if you prefer another shape then you can give it a try as well.
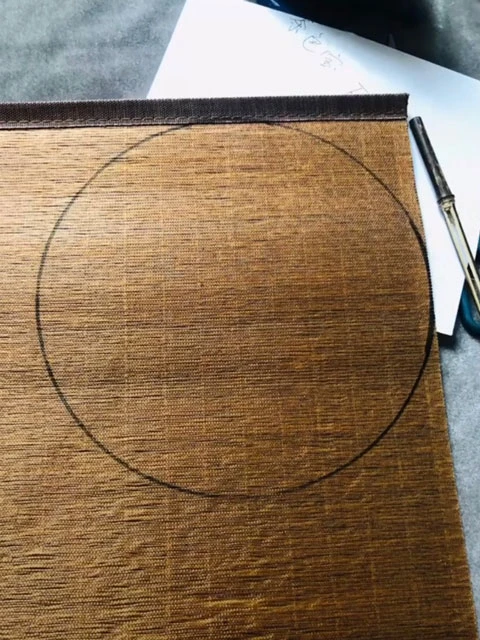
Step 2; Sketch, Trace, Cut
With an idea of the shape and size of the fan’s surface in mind. Draw out that idea on a piece of paper first.
- Sketch shape on paper.
- Cut out the shape.
- Trace paper cut-out on a bamboo mat (竹席).
- Cut out the bamboo mat.
(If you plan on having a second layer, then trace and cut from cloth. Or you can cut from the cloth in later steps.)
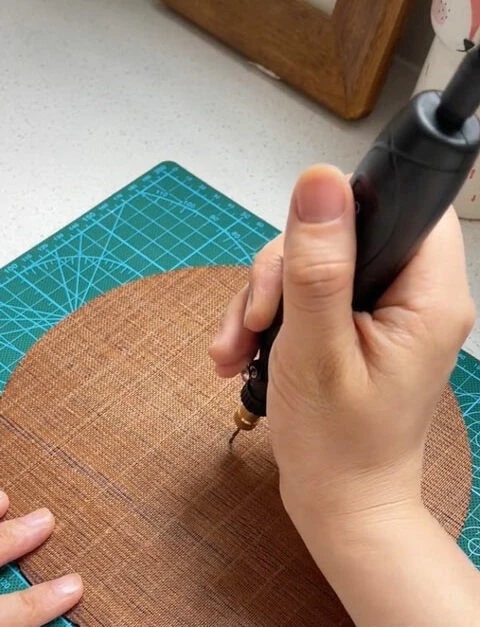
Step 3; Drilling Bamboo Mat
- Take the bamboo mat cut-out, measure the length and find the midpoint on the surface.
- Drill a small hole to represent that midpoint.
(If the shape you use is not a circle, there will be length and height. Find the intersection midpoint to drill a hole.)
Step 4; Combining (For Two Layers)
If your surface is two layers, you’ll first need to combine them.
- If you have the cloth cut-out from Step 2, just use double-sided cloth adhesive tape (or glue) and tape the bamboo mat and cloth back-to-back.
- If not, choose a piece of cloth that you want the second layer to be.
- Double-sided tape on the bamboo mat cut-out.
- Smooth out the cloth on the other side of the double-sided cloth adhesive tape. Make sure there are no creases.
- Use a scissor to cut out the cloth shape according to the bamboo mat that it is taped with.
- Then drill a hole in the exact spot where you previously drill so that the cloth layer also has an existing hole.

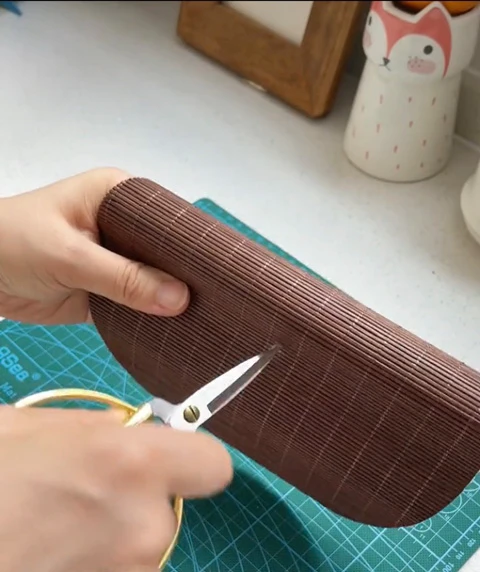
Step 5; Edge-closing
With surface(s) complete, move on to cutting out a long cloth strip used to close the edge of the fan and prevent the edge from fraying.
- Measure the circumference of the shaped bamboo mat cut-out. Circumference will be the length of the rectangle strip you need to cut out. (Add one or two centimeters if you want to be safer in case the measurement you went by runs out before you finish closing the edge.)
- Start folding the long strip over the edge of the shape using some sort of glue (hot glue/jewelry glue) to secure the folded strip on the surface.
- When you finish with one part of the edge, move on to the other. Use any type of clip to press on the finished part as you remove your hand’s pressure from it. That way you can work on other areas while waiting for the glue to fully set.
- Make sure there is no crease, bubbles, gap, or the strip popping back (翘边) up from the surface.


Step 6; Re-drilling on Cloth (For Two Layers)
After the glue dried, if you added a layer of cloth, re-drill the midpoint on the combined surface.
- Sharp objects or drills will go through the existing hole on the bamboo mat to the second layer.
- Create a hole in the cloth.
Step 7; Fan’s Handle
A waist fan (腰扇) is composed of two main parts; the handle and the fan’s surface. We now move on to the handle part that will have the surface wedged in between the split handle.
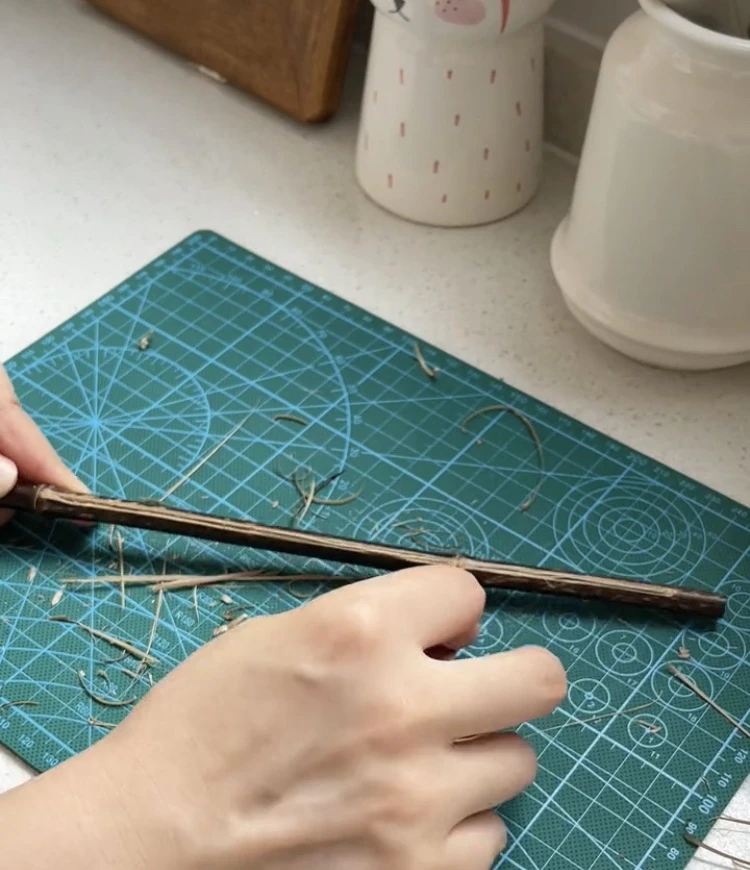
- Take out the bamboo stick. (Preferred less than 1 cm width, length around 50 cm.
Step 8; Carving Hole
You’ll have to create a long vertical hole down the bamboo stick in the middle.
- From the top of the stick counting downward, measure out around 2-3 cm. This will be the top of the fan which you leave untouched.
Option 1; (Saw user)
Option 1 will be using a saw to cut the length down the bamboo stick. You’ll need to be stable on the cut and have enough strength to not make mistakes.
- Starting from the end of the 2-3 cm that you counted, you start sawing a gap downward.
- The length of the gap will depend on the fan surface’s length + 1-2 cm extra space (or more based on preference.) (If the shape you use is not a circle, cut the stick’s length based on the longest length of the fan's surface.)
- This split will be where the fan’s surface is wedged in between the stick. The extra centimeters allow the fan’s rotation to go more smoothly after completion instead of being caught on the textures of the surface.
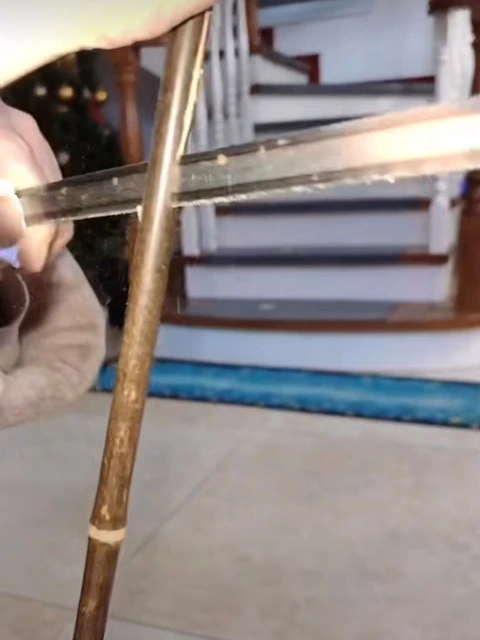
Option 2; (Blade user)
- Option 2 will require a bit more patience. You’ll be using a small blade (any; switchblade; art knife) instead of a saw.
- Below 2-3 cm, measure out where the other end is on the stick and add in 1-2 cm for extra space. (You can do so by layering the stick on the fan’s surface on a table and using the blade to carve a marking on the stick to show the length you should cut. Or measure the fan’s surface, then measure the stick and leave a marking.)
- You then start carving out a small vertical hole in the space between the beginning and ending markings.
- Slowly expand on the width of that hole so that it won't simply be a slit but will be able to fit the fan’s surface with a little more space remaining.
- The blade will allow you to carve out the hole and smooth out the inner edges at the same time.
Step 9; Smoothing Edges
After you finish creating the gap, you will need to smooth out the inner surface of the hole.
- Either use a blade and slowly carve away the rough edges or use sandpaper to slip in between the hole and rub away the splinters and rough edges.
- If you used a saw to create the split in the previous step, you’ll need to use a knife or blade to first widen the hole so that it fits the fan’s surface with some space remaining for smooth rotations.

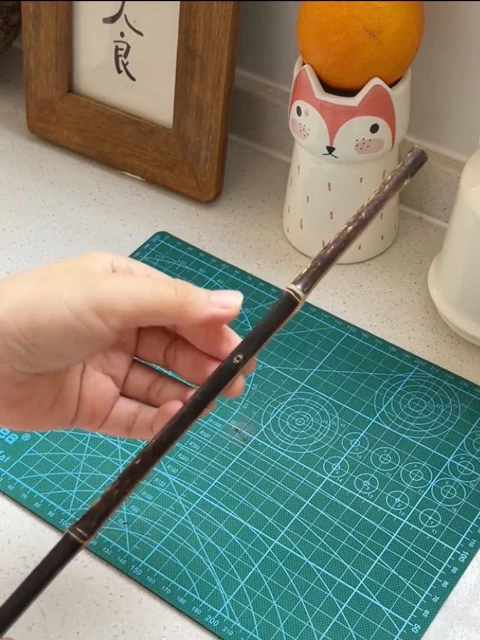
Step 10; Combining
Now you’ll be putting together the fan parts.
- Measure the length of the cut on the bamboo stick again and find the midpoint.
- Drill a hole.
- Slip the fan’s surface through the hole that you create on the stick.
- Make sure the hole on the surface and the handle matched up.
- Then if you wanted to add a copper disk between the handle and the fan’s surface, you can do so on both sides.
- Then you start inserting the fan’s nails into the hole on both sides.
- This will secure the fan’s surface to the handle. The midpoint that is nailed will be the rotation point for the surface when open and close.
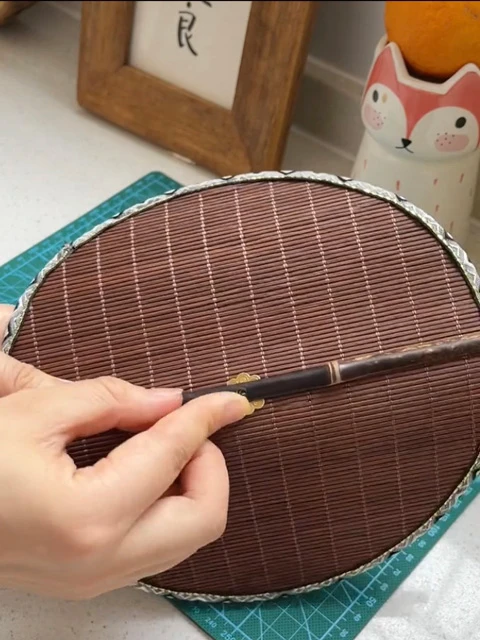
Step 11; Adding Accessories
Now you’re waist fan is done. But if the steps just stop here, then when you close the fan and curl it up there will be nothing to secure it in place. If you want to have something to secure it, you can use the accessories you’ll be adding.
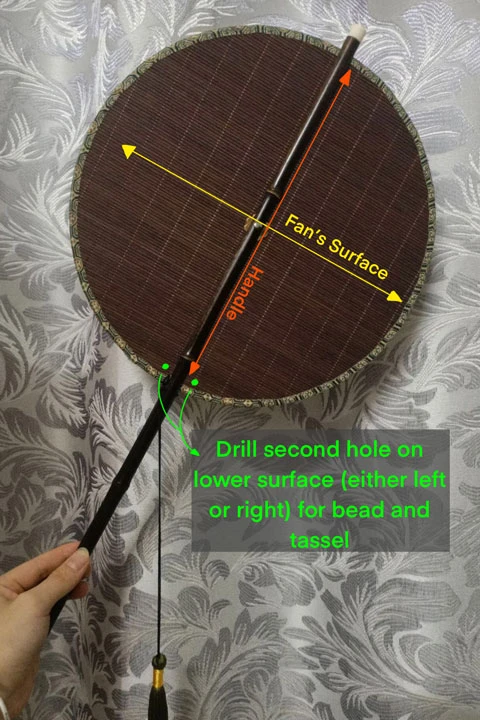
- First, unfold the fan so that the fan’s surface (specifically the bamboo mat) is perpendicular to the handle.
- Then either directly left or right of the handle, on the lower half of the fan’s surface, near the edge but before touching the edge-closing strip, you drill a second small hole on the fan’s surface.
- That hole just needs to be large enough to sew on a bead and tie on a tassel.
- Then choose a bead of your preference and sew it on the new hole you created on the fan’s surface.
- Then add on the tassels. It will be sewn/tied onto the same hole with the bead.
- Now you’re complete! The bead will act as the stopping obstacle when you are rotating the fan’s surface to open. The tassels will serve as decoration when the fan is open. But when the fan’s surface is rolled up, the tassels will work by wrapping around the surface and then looping around the bead so that the fan’s surface won’t randomly unfurl later on. Then you can just store them away without taking much space or wedge them on the belt/waistband when wearing hanfu.

More about hanfu accessory making:


W h o a . . . I can tell this was some effort!
Thanks!
That is one very huge fan on picture 4 😮
Yep! What I imagine screen fan would be like! Not sure if it’s 100% right.
How much does that thing weigh?!
thats so nice!
Aku menyukai kipas2 ini, unik
Terimakasih artikelnya untuk membuat kipas
This tutorial is really great.
thanks😍👍